
Yeah, I haven't painted the whole thing yet, but I'll get there. Why not follow me on Instagram and encourage me to make some progress, eh?
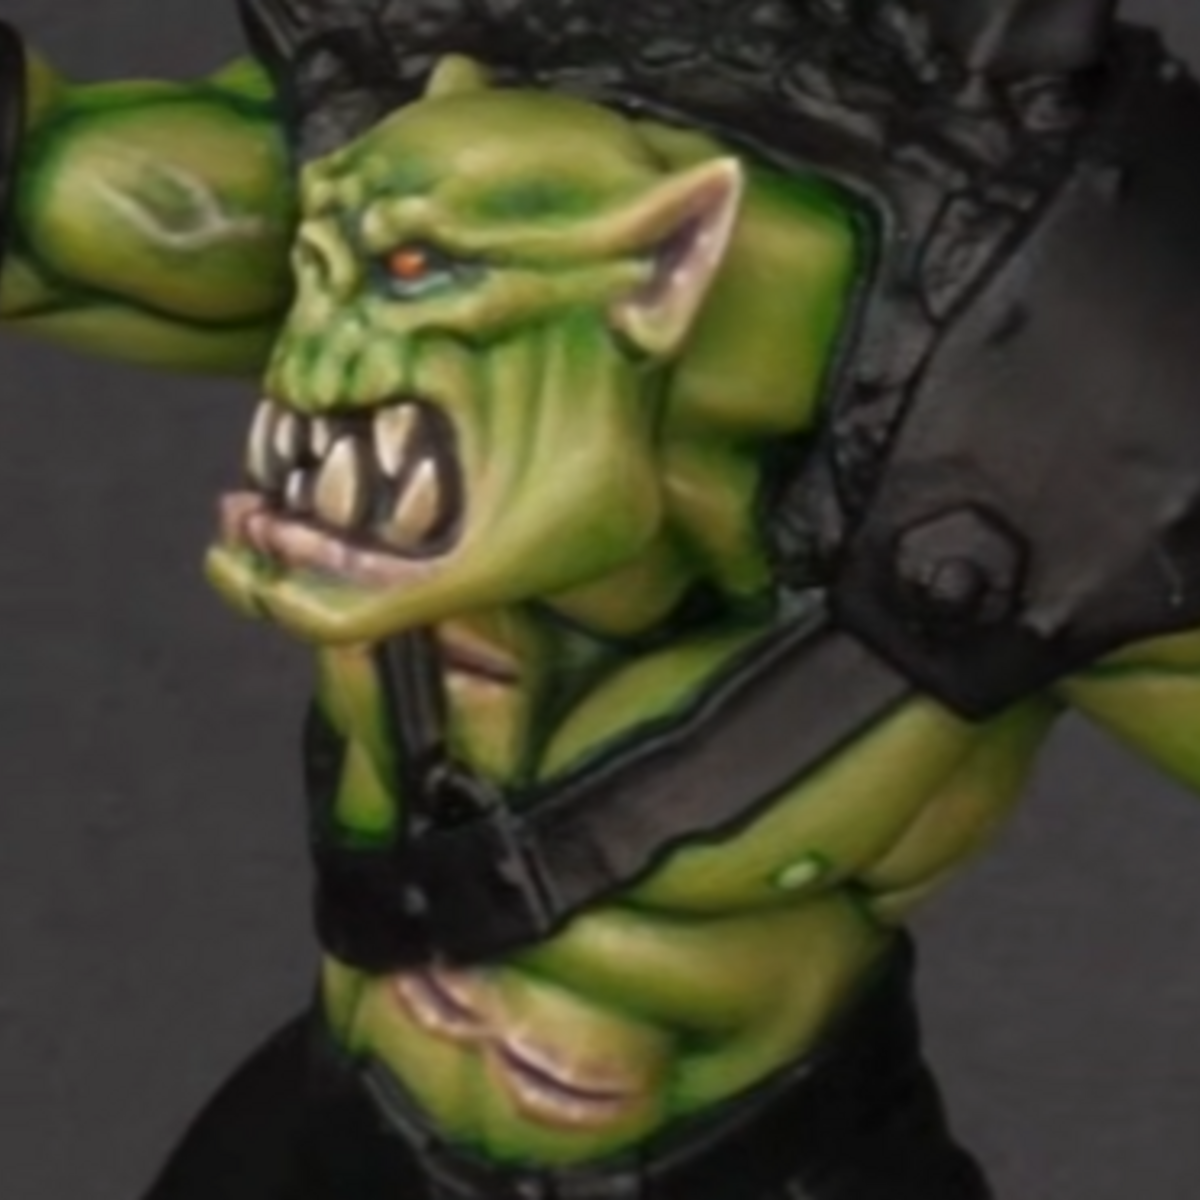
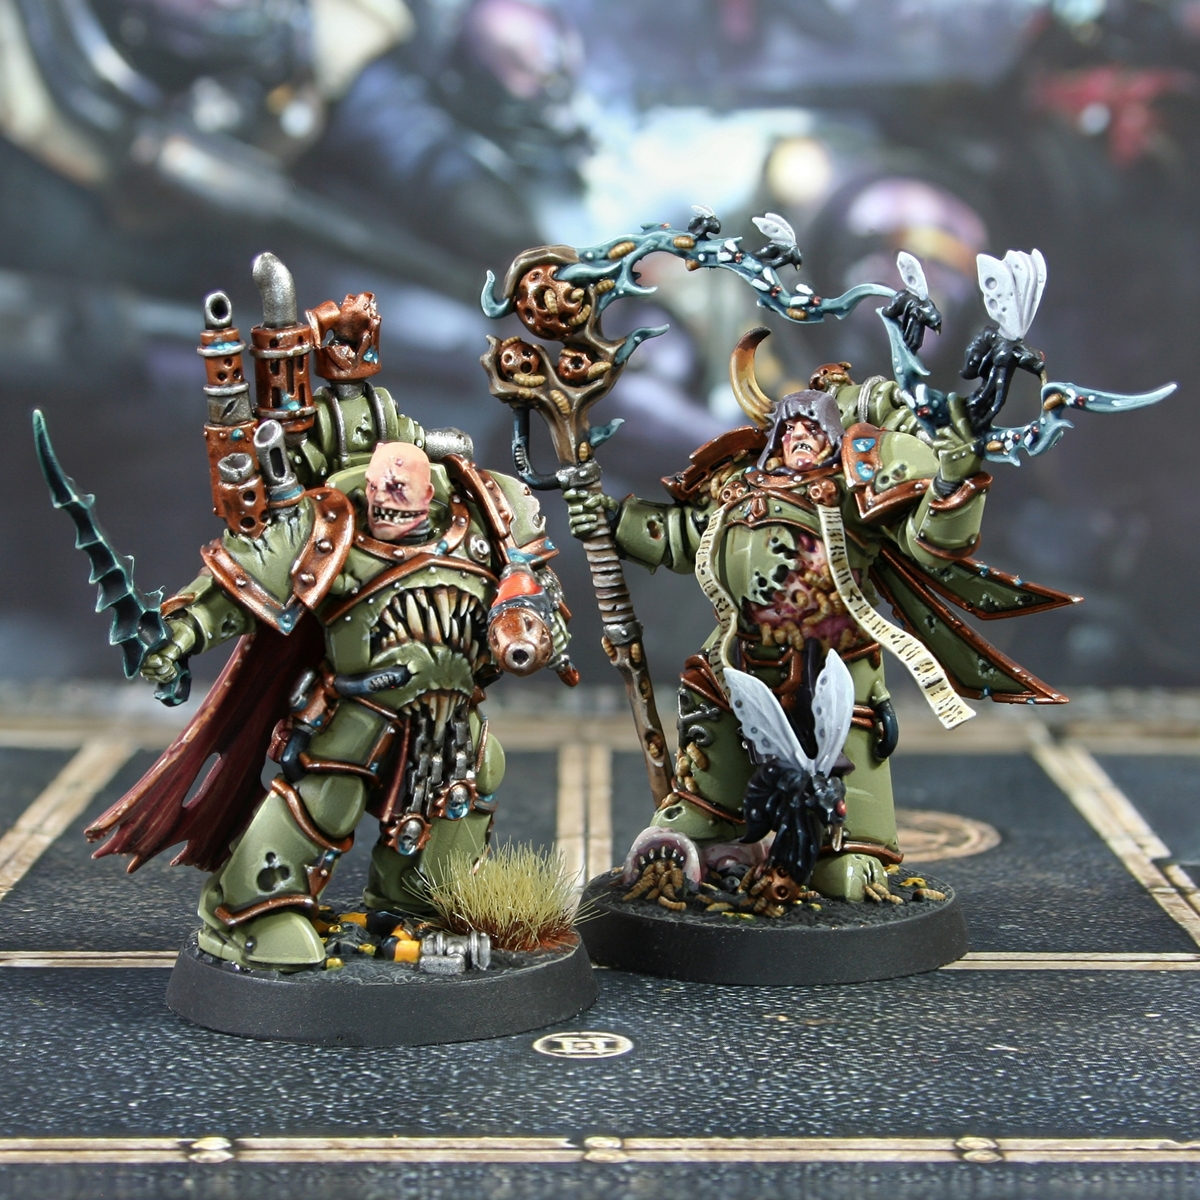
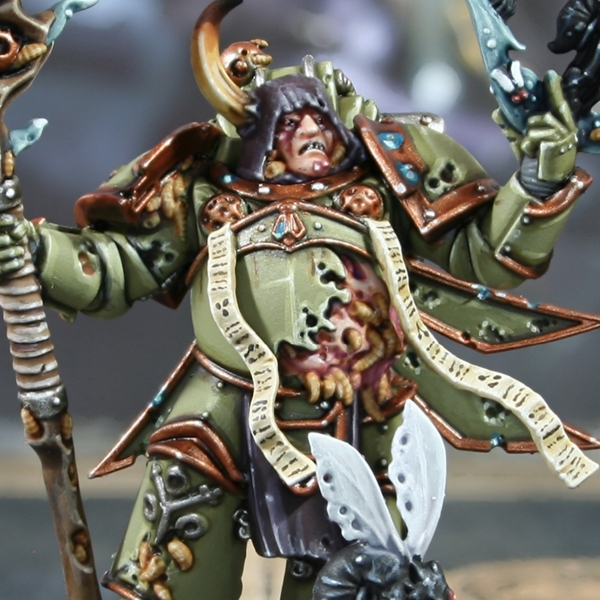
 Green Power Armour
- I started by priming with Vallejo Surface Primer Russian Green 4bo . You could use any colour and work your way up, but this is easier.
- Now basecoat the armour with Death Guard Green .
- Thin some Athonian Camoshade with an equal amount of water (or medium) and add some general shading to the recesses.
- Mix Rhinox Hide and Caliban Green 1:1 and shade deeper recesses with fine lines. I keep this mix pretty thin to control it easier.
- Add chunky highlights with Ogryn Camo , with a little Death Guard Green mixed in. Probably around 4:1.
- Add smaller, fine highlights with Krieg Khaki .
- Mix some White into the Krieg Khaki and selectively highlight corners.
- Finish the armour with specular highlights of White where needed.
Undersuit
- Basecoat with Mechanicus Standard Grey .
- Wash with Nuln Oil .
- Pick out the majority of the easily accessible ridges with Dawnstone .
- More selectively highlight with Administratum Grey .
- On a few ridges where you really want to enhance the shape, mix a little White into the Administratum Grey , and apply small highlights.
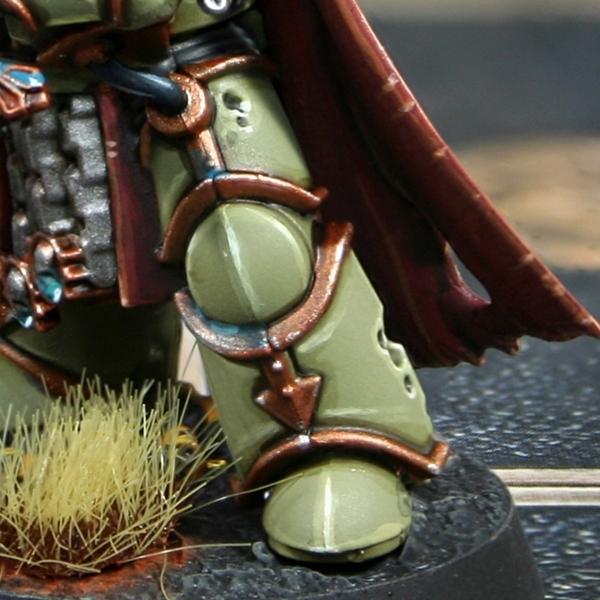
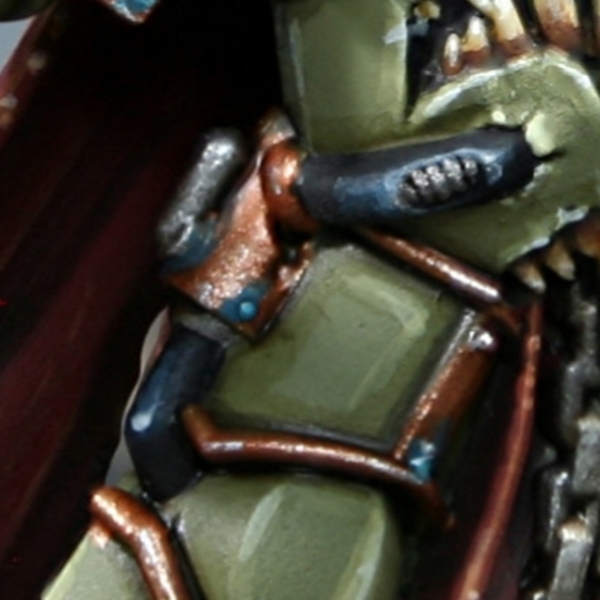
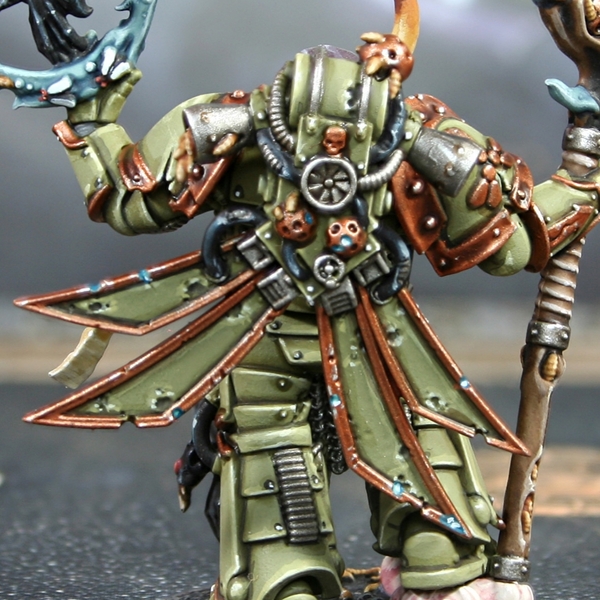 Bronze Armour Trim
- Basecoat with Hashut Copper mixed with just a touch of Doombull Brown , about 9:1 if you wanted a ratio.
- Shade recesses and around recesses with Agrax Earthshade .
- In the very deepest parts, add line shading with a thin 1:1 mix of Khorne Red and Abaddon Black .
- Mix some light gold and silver into the base mix, so the paints are roughly in equal parts. If you wanted to use Citadel paints, I would recommend Liberator Gold and Stormhost Silver . Use this mix to add highlights to edges.
- Increase the amount of Stormhost Silver and add fine highlights.
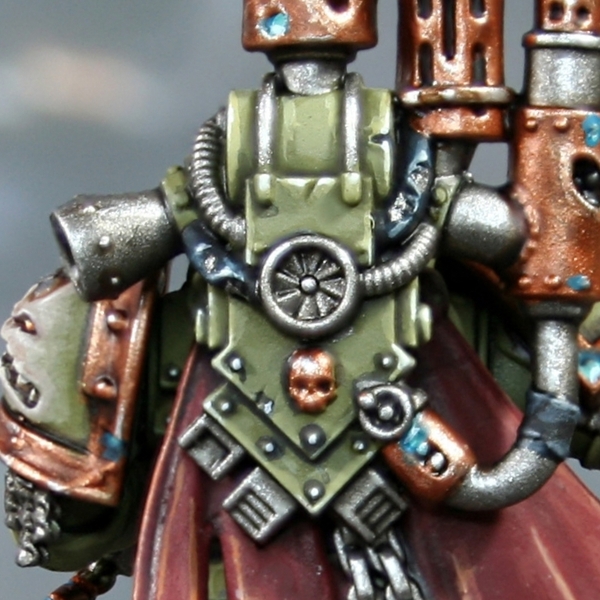 Steel
Steel
- Basecoat with Leadbelcher .
- Wash with Nuln Oil .
- Edge highlight with Ironbreaker .
- Add fine highlights with small amounts of Vallejo Model Air Silver RLM01 Metallic .
- To dirty up the metal work, I would recommend glazes of browns. I used Agrax Earthshade , mostly.
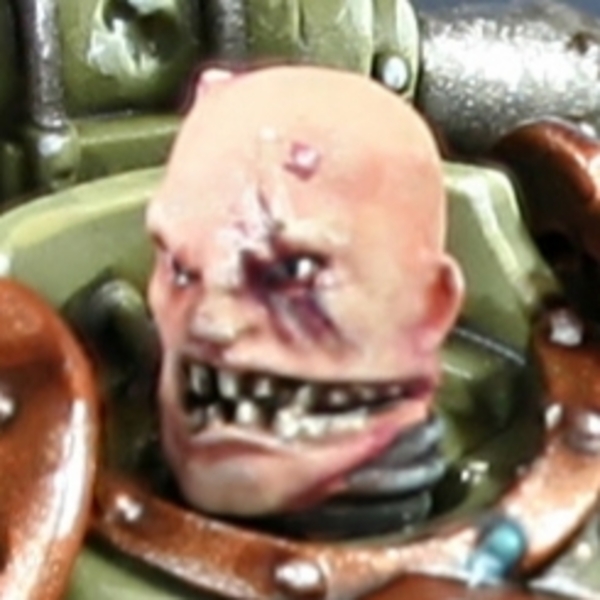 Skin
Skin
- Basecoat the skin with a mix of 3 parts Cadian Fleshtone , 2 parts White and 1 part Administratum Grey . This is quite a complex mix, but you only need to do it the one. I would advise mixing a decent amount, then just taking a small blob whenever you need it in future steps.
- Mix you base mix 1:1 with Doombull Brown , then thin it with a substantial amount of Lahmian Medium , until it is at a glaze consistency. Now use this to glaze in some general shading.
- Add extra definition to recesses with some thin Doombull Brown , all by itself. I use this colour purely for very deep folds, to show the break between his "hands" and his belly, plus to separate dem cheeks.
- Around boils and areas of soreness, glaze Screamer Pink , made more manageable with some Lahmian Medium .
- If you wanted to make any areas look extra grim, pop a small amount of Xereus Purple in there. I stuck to using this for little drips from a few wounds, mimicking the box art.
- Now mix your basecoat colour 1:1 with White and pick out some general highlights.
 Pallid Skin
- Basecoat with 1:1 Rakarth Flesh and Pallid Wych Flesh .
- Mix Khorne Red , Doombull Brown and Abaddon Black in roughly equal amounts, until you have a nice bloody colour. Now mix a small amount into your base colour and add general shading to the skin.
- Now repeat, adding a little more of the Khorne Red , Doombull Brown and Abaddon Black into your 1:1 Rakarth Flesh and Pallid Wych Flesh . use this redder colour to define the deeper parts of the recesses.
- Now take a little of your base colour and mix it 1:1 with Pallid Wych Flesh . Use this for highlights on raised areas of the skin.
- Selectively highlight with pure Pallid Wych Flesh .
- Finish with a few specular highlights of White .
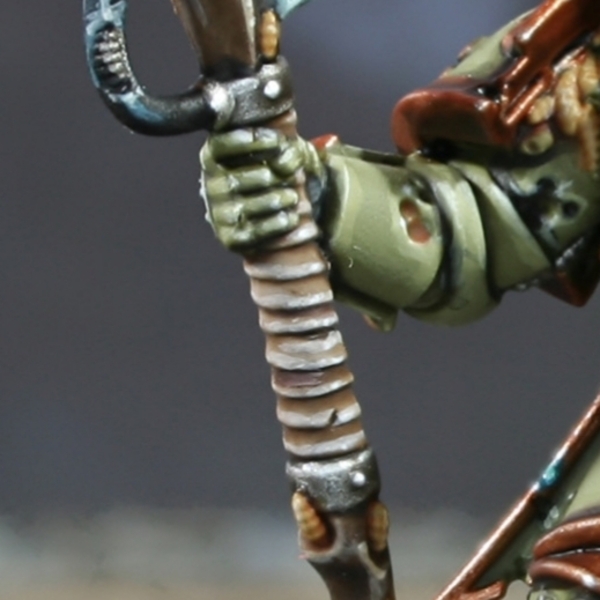
 Wooden Staff
- Basecoat with Steel Legion Drab .
- Wash with Agrax Earthshade .
- Add edge highlights with Baneblade Brown , both to edges and areas where you want to add the effect of woodgrain.
- Use Karak Stone to add smaller highlights, towards points.
- Mix some White into the Karak Stone and add specular highlights where needed.
 Bandages
- Basecoat with Rakarth Flesh .
- Wash with 1:1 Agrax Earthshade and Contrast Medium .
- Add edge highlights with 1:1 Rakarth Flesh and Pallid Wych Flesh .
- Now selectively highlight everything with Pallid Wych Flesh .
- Add a few dots of White along edges to add a little texture.
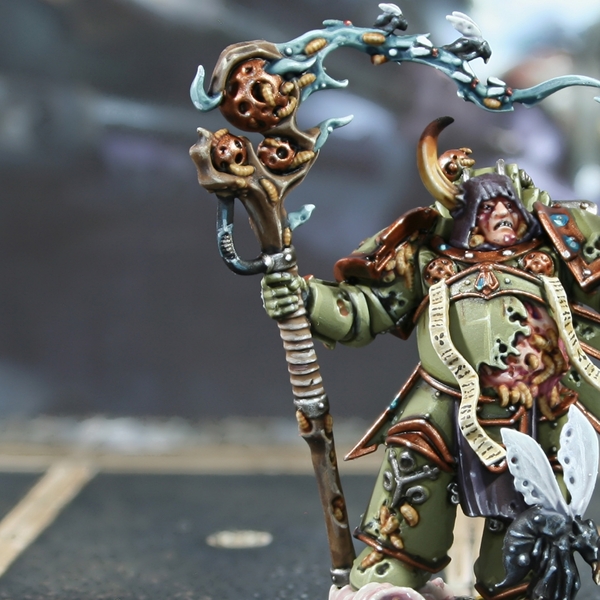
 Blue Smoke
- Basecoat with Thunderhawk Blue and Ushabti Bone , mixed 1:1.
- Wash the smoke with Drakenhof Nightshade mixed 1:1 with Contrast Medium . Try and pull the pigment towards recesses and areas where the smoke is thickest.
- Mix a pure White , into the base mix gradually and build up highlights. Apply them towards the tip of the smoke, furthest from the source.
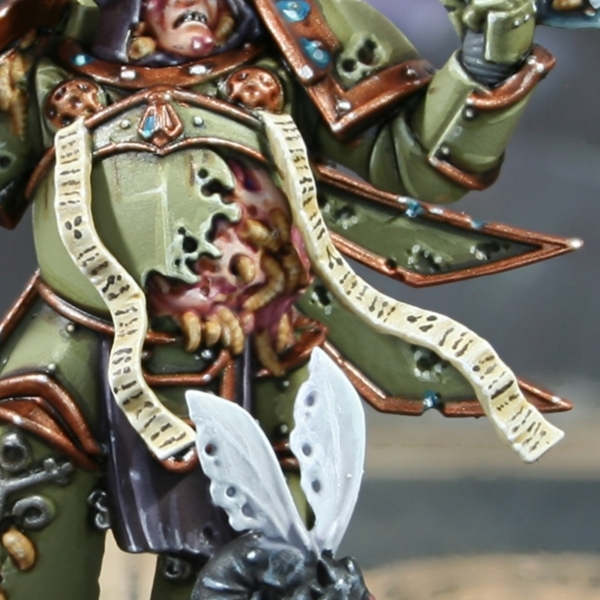 Parchment
- Basecoat with Zandri Dust .
- Run down the length of the parchment painting rough scratchy lines of Ushabti Bone . The aim is to cover almost everything, but not obsessing about covering everything. This should leave a little Texture.
- Do the same, but with Screaming Skull , aiming your brush strokes towards the slightly raised bits more.
- Now, with 1:1 Screaming Skull and White , apply chunky highlights down the edges in a similar way to the previous steps. The aim is to make it look rough towards the edges.
- Glaze the entirety of the surface with Seraphim Sepia , pulling your brush into the slight waves of the parchment.
- Add a few White dots down the edges, again, making the edges look rough.
Mix Rhinox Hide and Abaddon Black 1:1. Use a brush with a very fine point and paint rows of dots and dashes across the parchment. Do a second pass if needed to make it look more organic and like writing.
Black Leather
- Basecoat with Abaddon Black .
- Chunky highlights of 1:1 Abaddon Black and Skavenblight Dinge .
- Fine highlights of Skavenblight Dinge .
- Selective highlights of Stormvermin Fur .
- Specularhighlights of Karak Stone .
 Black Rubber Tubing
- Basecoat with Abaddon Black .
- Paint chunky highlights of Incubi Darkness onto raised details.
- Mix the Incubi Darkness 1:1 with Deepkin Flesh and add fine highlights onto edges.
- Add selective hihglights of Deepkin Flesh on courners and points that would catch the light.
- Mix a little Ivory or Pallid Wych Flesh into your Deepkin Flesh and add specular highlights where needed.
 Black Weapon Casing
- Basecoat with Abaddon Black .
- Chunky highlight with Dark Reaper .
- Fine highlights of 1:1 Dark Reaper and Administratum Grey .
- Selective highlights of Administratum Grey .
- Specular highlights of Administratum Grey and White .
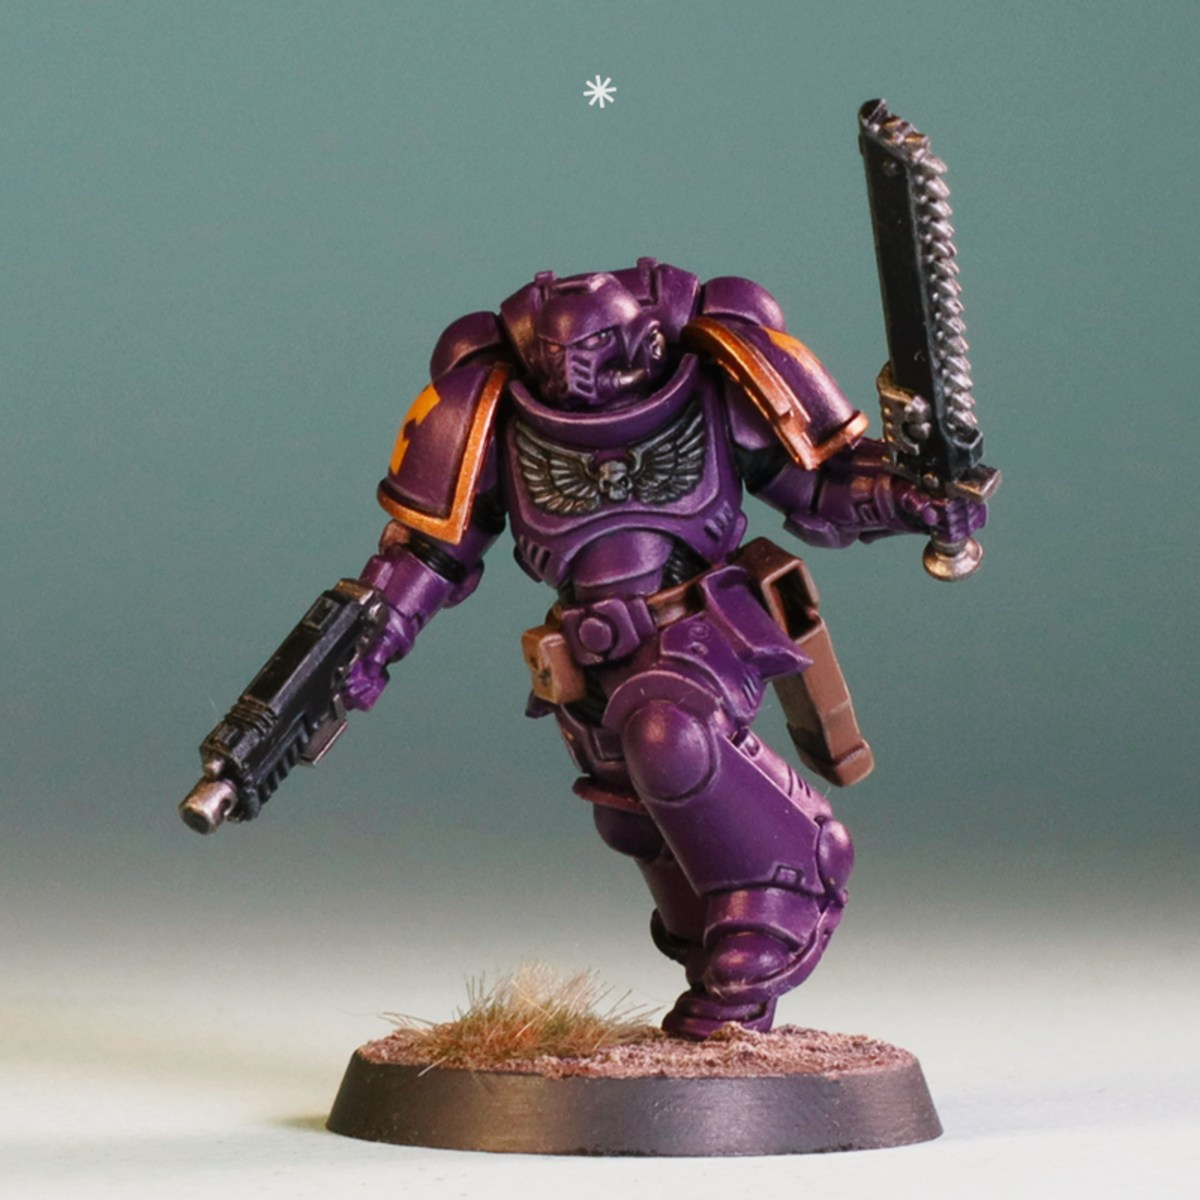
 Purple Cloth
- Basecoat with a mix of Khorne Red and Incubi Darkness mixed 1:1. Maybe lean slightly more towards the Incubi Darkness to ensure it reads as purple.
- Add Administratum Grey to the base mix 1:1 and add chunky highlights.
- Increase the amount of Administratum Grey again, so it is now 1:2. Now add fine highlights to everything.
- Selectively highlight curves and corners with pure Administratum Grey .
- Add White Scar into the Administratum Grey 1:1 and add very small/specular highlights to upward facing points.
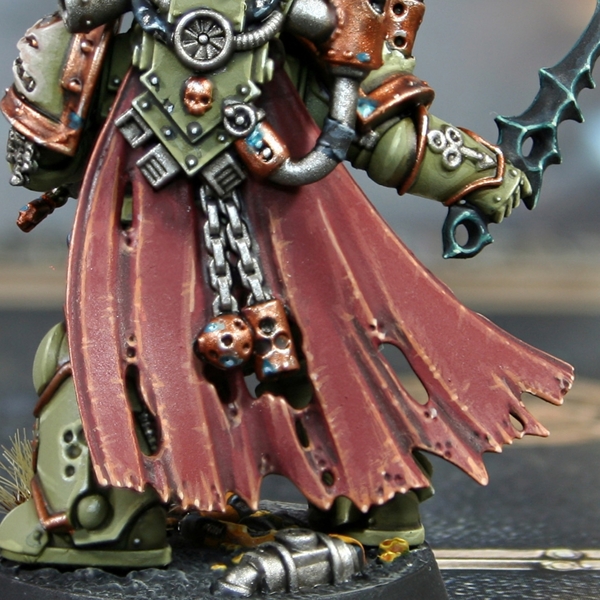 Red Cloth
- Basecoat with a 1:1 mix of Khorne Red and Doombull Brown .
- Shade with Khorne Red and Abaddon Black mixed. I mixed an equal amount and then increased the black for very deep folds.
- Add Jokaero Orange into the base mix and apply chunky highlights.
- Highlighting within the last stage, go over the area again with small amounts of pure Jokaero Orange .
- Add some Vallejo Model Colour Ivory (or Screaming Skull ) into the Jokaero Orange and selectively hihglihgt, inclreasing the amount and making the highlights smaller as you go.
Bone Spikes
- Wash with Skeleton Horde thinned 1:3 with Contrast Medium . This is to both add a little colour into detail and begin shading around the base of the horns.
- Run a thin line of Agrax Earthshade around the base of the horn and carefully pop some into cracks too.
- Glaze XV-88 upwards, covering roughly two thirds of the bone.
- Repeat the process covering less area with a glaze of Mournfang Brown . This colour is so rich, I kept it thin and did two passes in the end.
- Mix the Mournfang Brown with Rhinox Hide and glaze again. At this point you should be covering less than one thirds of it (roughly).
- Finally, glaze the tip with Rhinox Hide .
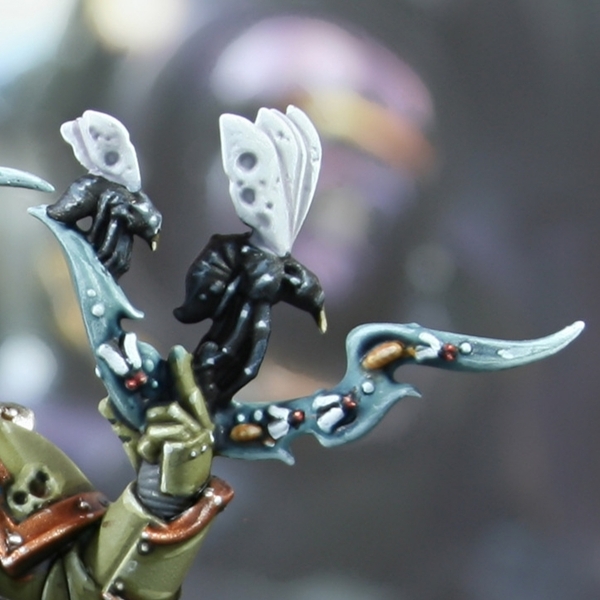
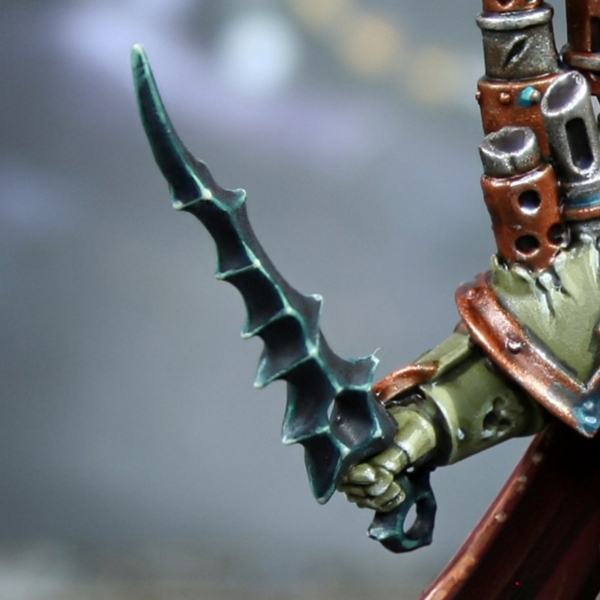 Plague Sword
- Basecoat with 1:1 Black and Incubi Darkness .
- Apply chunky highlights of Incubi Darkness .
- Now fine highlight all edges with Kabalite Green .
- Selectively highlight with Sybarite Green .
- Finish with very small highlights of Gauss Blaster Green .
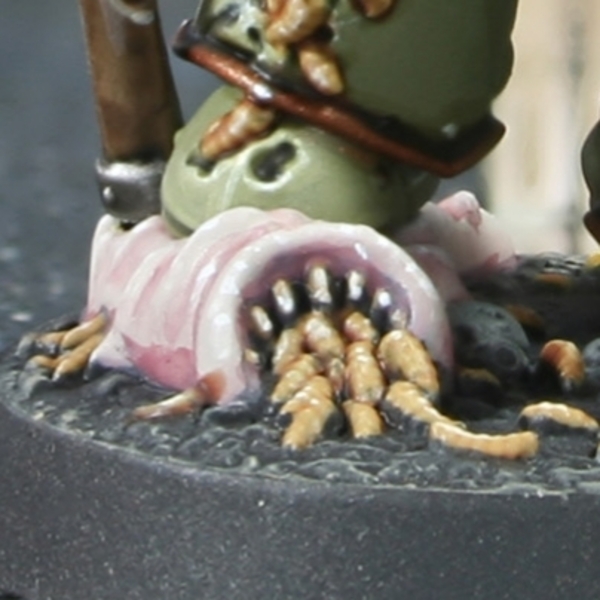
 Grubs/Maggots
- Basecoat with 1:1 Zandri Dust and Zamesi Desert .
- Wash with Reikland Fleshshade .
- Highlight raised detail with Zamesi Desert .
- More selectively highlight with 1:1 Zamesi Desert and Flayed One Flesh .
- Finish with specular Flayed One Flesh highlights, where needed.
 Fly Wings
- Basecoat with 1:2 Celestra Grey and White .
- Wash with a mix of 1 part Apothecary White , Lahmian Medium and a touch of Warpfiend Grey .
- Shade deep recesses with pure Warpfiend Grey .
- Highlight with White .

Rookie Brushes
RookieBrushes
Aspiring miniature painter and biscuit enthusiast. Here to share my hobby and help where I can.
Citadel Painting System 54
Base 16
- Abaddon Black
- Caliban Green
- Celestra Grey
- Death Guard Green
- Incubi Darkness
- Jokaero Orange
- Khorne Red
- Leadbelcher
- Mechanicus Standard Grey
- Mournfang Brown
- Rakarth Flesh
- Rhinox Hide
- Screamer Pink
- Steel Legion Drab
- XV-88
- Zandri Dust
Shade 6
- Agrax Earthshade
- Athonian Camoshade
- Drakenhof Nightshade
- Nuln Oil
- Reikland Fleshshade
- Seraphim Sepia
Layer 28
- Administratum Grey
- Baneblade Brown
- Cadian Fleshtone
- Dark Reaper
- Dawnstone
- Deepkin Flesh
- Doombull Brown
- Flayed One Flesh
- Gauss Blaster Green
- Hashut Copper
- Ironbreaker
- Kabalite Green
- Karak Stone
- Krieg Khaki
- Liberator Gold
- Ogryn Camo
- Pallid Wych Flesh
- Screaming Skull
- Skavenblight Dinge
- Stormhost Silver
- Stormvermin Fur
- Sybarite Green
- Thunderhawk Blue
- Ushabti Bone
- Warpfiend Grey
- White Scar
- Xereus Purple
- Zamesi Desert
Technical 2
- Contrast Medium
- Lahmian Medium
Contrast 2
- Apothecary White
- Skeleton Horde
Vallejo Model Air
Base 1
- 71.063 Silver RLM01 Metallic
Vallejo Model Color
Base 3
- 70.918 Ivory
- 70.950 Black
- 70.951 White
Vallejo Surface Primer
Base 1
- 70.609 Russian Green 4bo