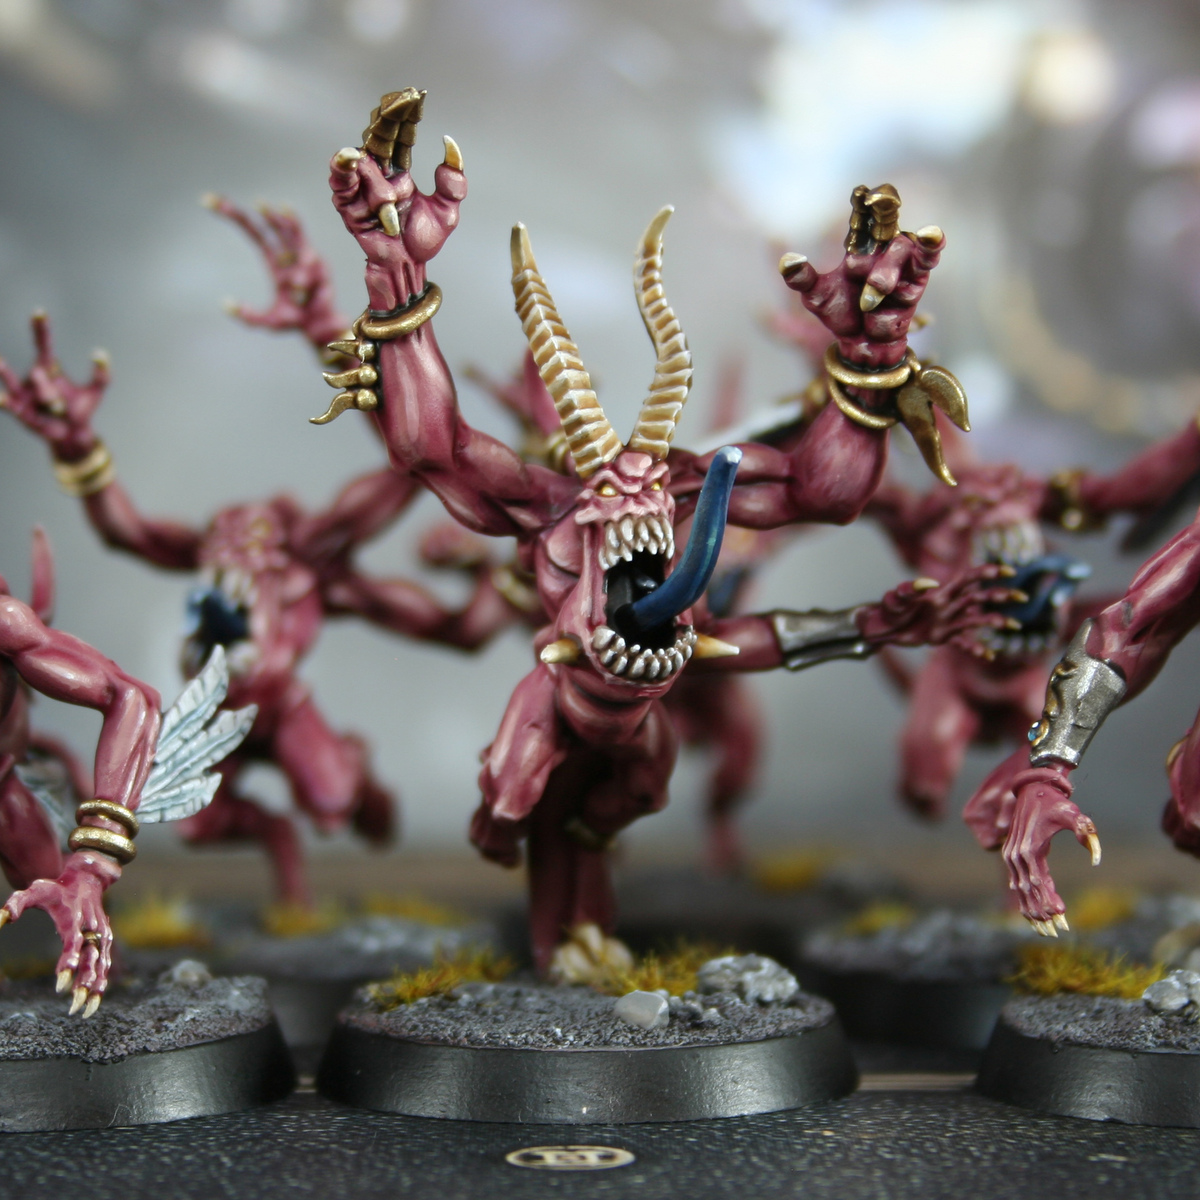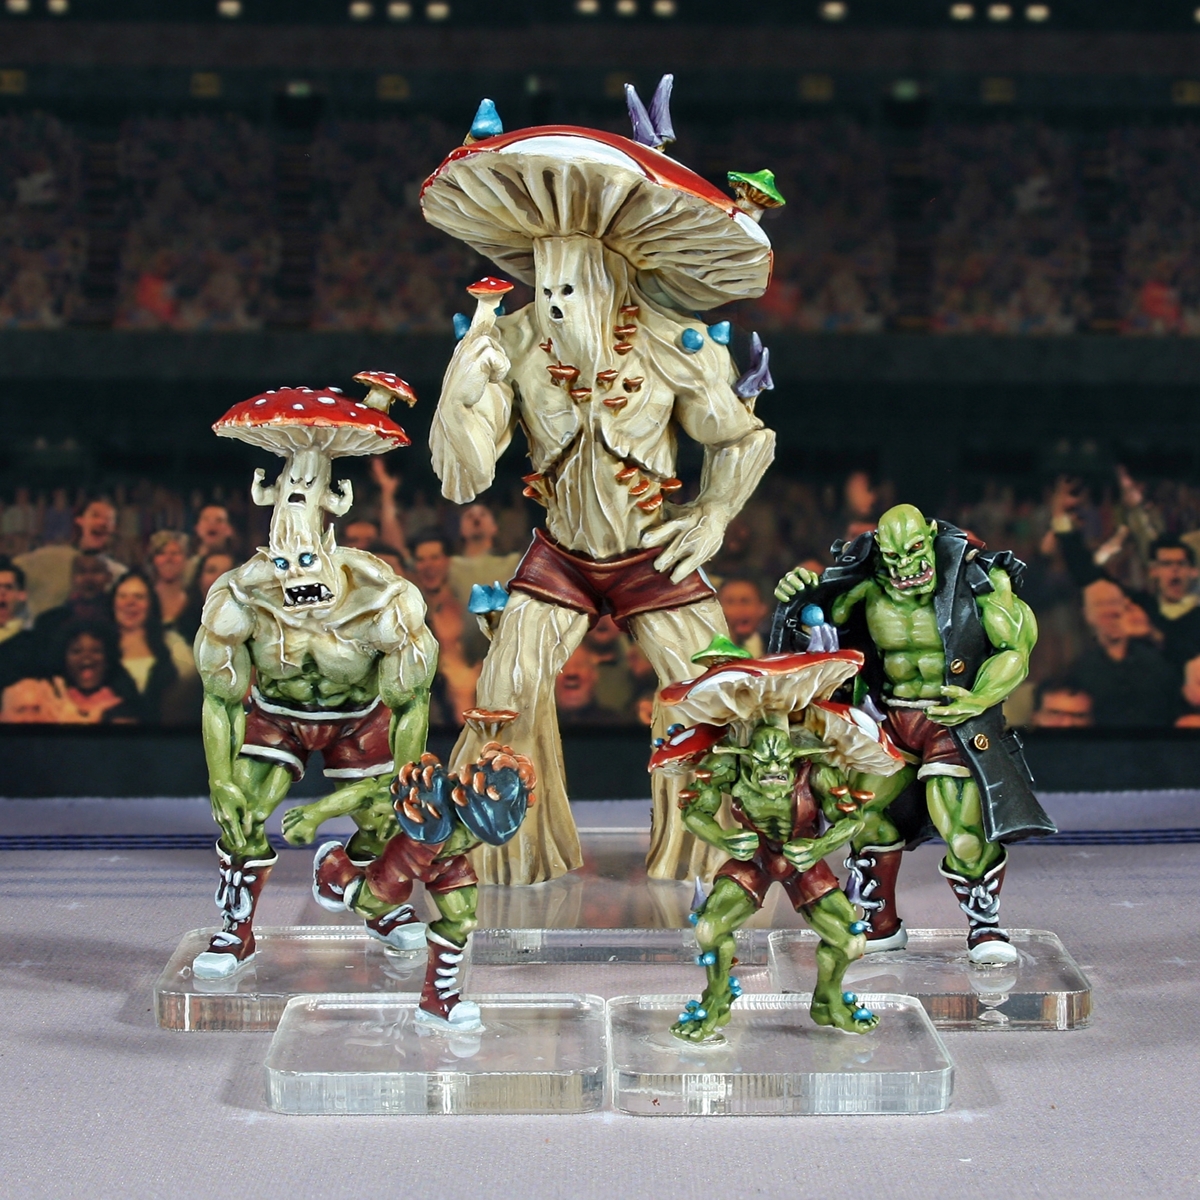

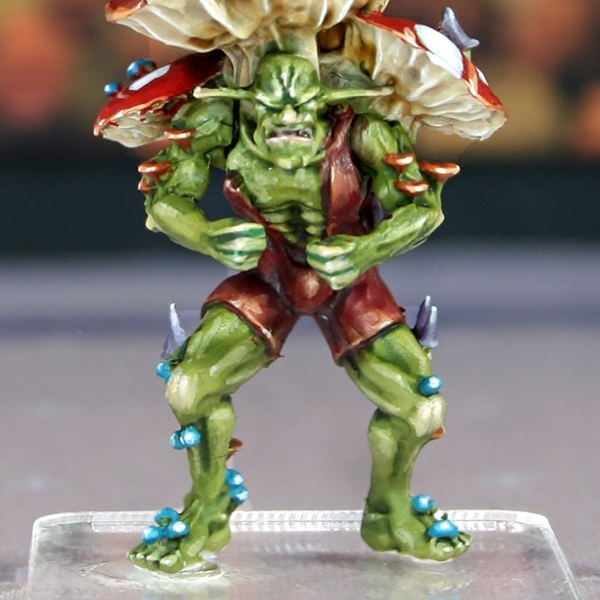
How I painted ever wrestler in "The Mighty Madcaps" team for Rumbleslam. I stuck quite close to the box art with these boys, but made a few minor changes to make them more to my taste. I hope you like them.
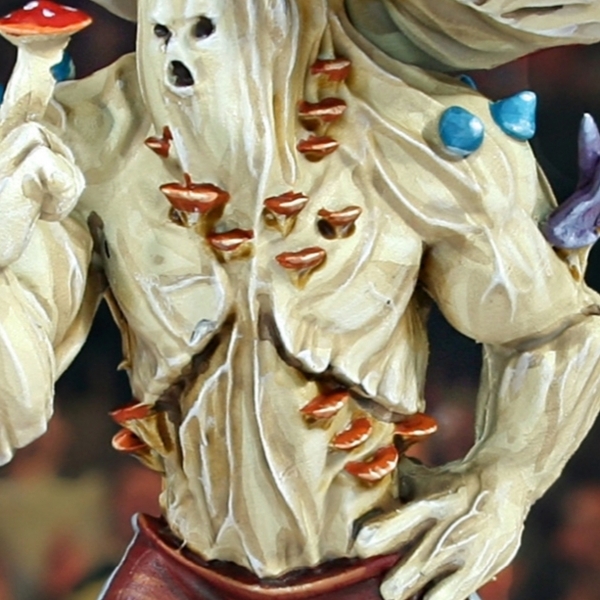
 Mushroom Flesh
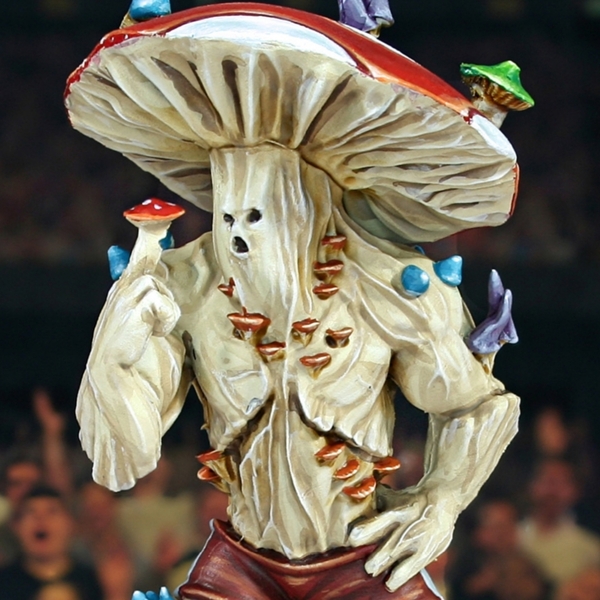
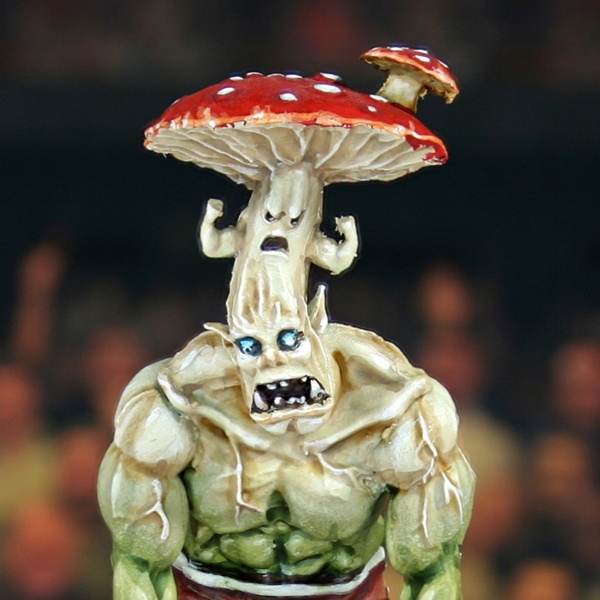
This is the recipe I use for both the large mushrooms and the stems of the smaller ones. Make sure you simplify the process for the smaller areas.
- Basecoat with Screaming Skull .
- Add soft shading to all of the flesh with a 1:1 mix of Screaming Skull and Baneblade Brown . This may take a couple of passes. I like to thin with Lahmian Medium and be particularly generous on the lower half of the Henchroom's legs, which gets an all over glaze, pulling the brush downwards.
- Shade more selectively with pure Baneblade Brown . Again, be more generous on the lower half of the Henchroom's leg.
- In particularly deep recesses, run some Dryad Bark in, for extra definition. This is also a good colour for darkening the eye sockets and where the "flesh" meets other materials too.
- On large areas of "flesh", consider a glaze of Seraphim Sepia on the lower half of the leg and other heavily shaded areas. I found this brought a little more warmth and variation to the skin, making it look more alive.
- Edge highlight with 1:1 Screaming Skull and White .
- Finish with selective highlight of pure White .
 Glowing Eyes
- Flood the eyesocket with Night Lords Blue .
- Pick out the eyeball with Sotek Green /.
- Add a smaller highlight of Baharroth Blue .
- Finish with a dot of White in the centre.
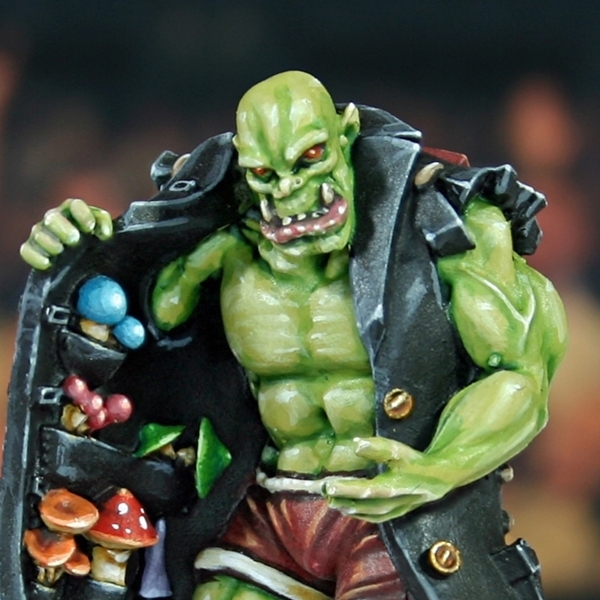
 Toadstool Peddler Skin
I wanted this ork to have different skin to the Juicer and his goblin mates. I think this richer skin tone sets him apart from the infected wrestlers nicely.
- Basecoat with a mix of Averland Sunset and Skarsnik Green . I make the ratio about 1:1, but add a little more Skarsnik Green , so it reads as green and not yellow.
- Shade recesses with Biel-Tan Green . Use a combination of glazing and traditional recess shading.
- Run small amounts of Coelia Greenshade into deep recesses with a fine brush. Mix in a little Contrast Medium if you want to make it easier to handle.
- Add general highlights to the skin with Ogryn Camo .
- Now apply fine highlights with Krieg Khaki .
- Glaze Kislev Flesh over ear tips, lips, the nose, knuckles and elbows.
- Add final selective and specular highlights of 1:1 Screaming Skull and White .
 Red Eyes
- Basecoat with Khorne Red .
- Paint the inner part of the eye with Evil Sunz Scarlet .
- Paint a small highlight of Troll Slayer Orange in the middle of the eye, to represent the iris.
- Finish with an even smaller, specular highlight of Ice Yellow .
 Teeth
Teeth
- Pick out teeth with Rhinox Hide , using this as shading too.
- Pick out the majority of the tooth with Zandri Dust .
- Highlight teeth with Screaming Skull .
- Selectively highight with Wraithbone .
- Add very small/specular highlights with White .
 Goblin/Ork Skin
- Basecoat with Elysian Green .
- Make a mix of 3 parts Athonian Camoshade , 1 part Drakenhof Nightshade and 1 part Biel-Tan Green . Use this mix to glaze over the skin, pulling pigment towards the recesses.
- Add a small amount of Incubi Darkness to the above mix and shade only the deepest recesses.
- Highlight with Elysian Green and Ogryn Camo , mixed 1:1.
- Add finer highlights, covering even less area with pure Ogryn Camo .
- With a 1:3 mix of Ogryn Camo and Screaming Skull , selectively highlight the skin.
- Add very small/specular highlights with Screaming Skull .
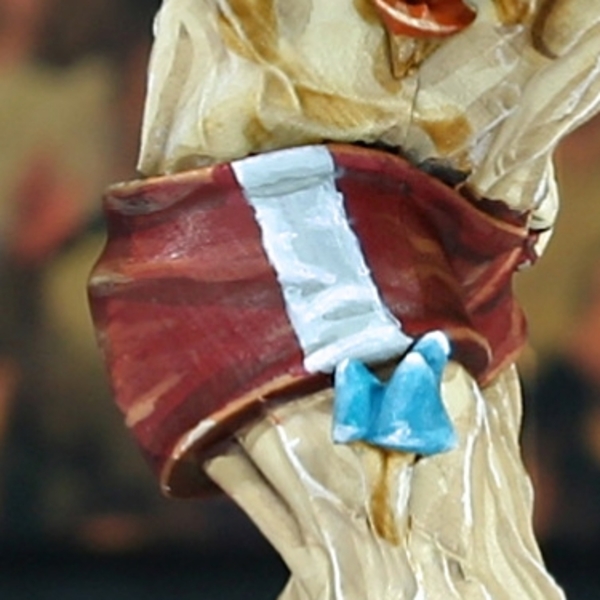
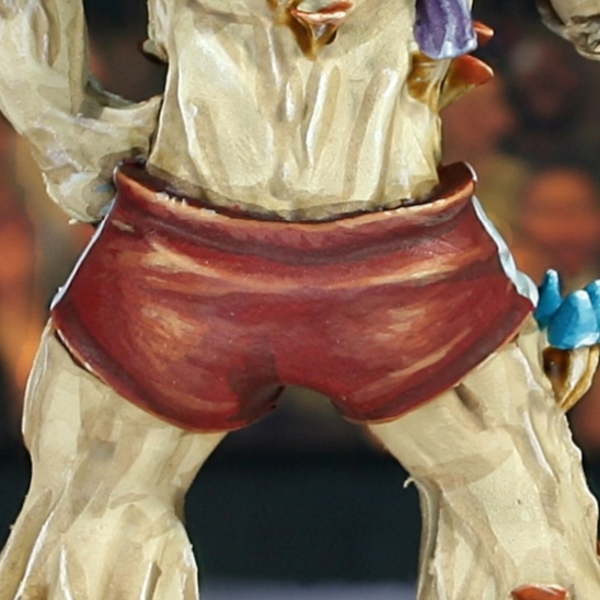 Red Cloth
- Basecoat with 1:1 Khorne Red & Doombull Brown .
- Mix Khorne Red & Abaddon Black 1:1, thin it down and shade the recesses.
- Highlight with a 1:1 mix of your base colour and Jokaero Orange .
- With pure Jokaero Orange add fine highlights.
- Selectively highlight with 1:1 Jokaero Orange and Ushabti Bone .
- Finish of with specular highlights of Screaming Skull , where needed.
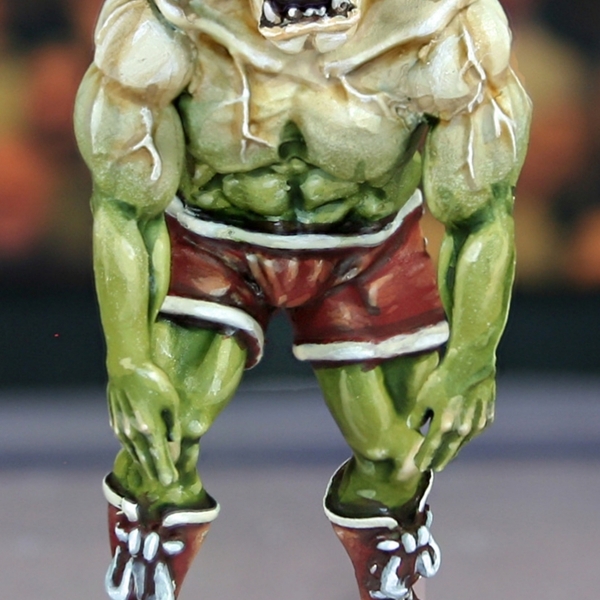 Cream Trim
I like to use this recipe for the horizontal trim on shorts and boots specifically. In my mind these are cloth and would be a different material to the laces, soles etc.
- Basecoat with Ushabti Bone .
- Highlight with Screaming Skull .
- Selectively highlight with Pallid Wych Flesh .
- Finish with very small White highlights.
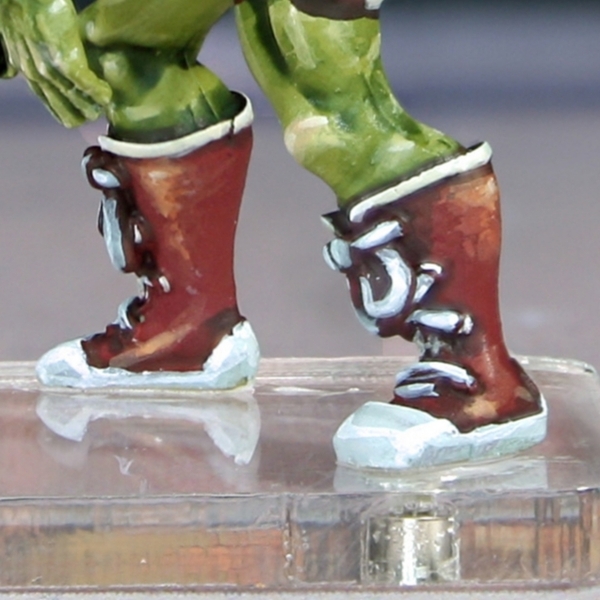 White Trim
- Basecoat with 1:1 Celestra Grey and White .
- Shade with a small amount of Dawnstone .
- Mix the base colour 1:1 with more White and add in chunky highlights.
- Finish with fine highlights of pure White .
 As mentioned above, I like this nice neutral white for laces and the soles of the shoes. I also think it works nicely as detail on the Henchroom's shorts. This is simply to differentiate it from the cream of his skin.
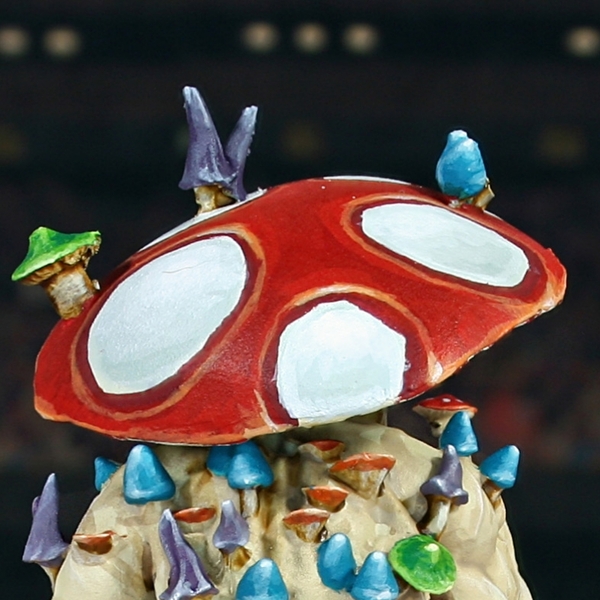 Red Mushroom Caps
- Basecoat with Mephiston Red .
- Shade around white spots with Khorne Red .
- Glaze highlight with Evil Sunz Scarlet
- Highlight more selectively with Fire Dragon Bright .
- Add small highlights of 1:1 Tau Light Ochre and White .
 White Spots
- Basecoat with :1:1 Celestra Grey and White .
- Glaze in a little Celestra Grey for shading.
- Mix the basecolour 1:1 with White and add highlights.
- Highlight more selectively with White .
If you wanted a red cap mushroom to be present in the jacket of the Toadstool Peddler, be sure to simplify these last two stages. You wont need every colour and can definitely get away with just having a few small pure White dots on it.
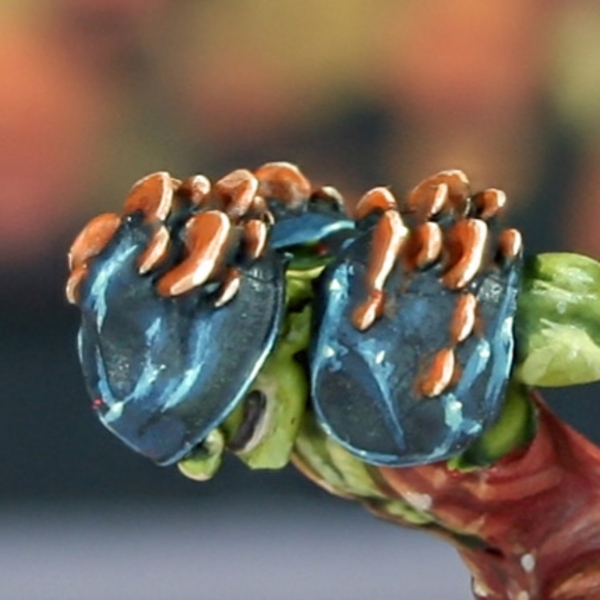 Armour
- Basecoat with 1:1 Abaddon Black and Stegadon Scale Green .
- Highlight with Stegadon Scale Green .
- Mix the Stegadon Scale Green 2:1 with Ice Yellow and add fine highlights.
- Mix the above paint 1:1 with more Ice Yellow and selectively highlight.
 Black Trenchcoat
- Basecoat with Black .
- Glaze with 4:1 Abaddon Black and Kantor Blue . The aim here is to cover most of the cloth, avoiding recesses and pulling your brush towards adges. I like to do this in scratchy lines to add texture.
- Take the above colour and mix it 1:1 with Administratum Grey . Ad general highlights using scratchy lines like above. Make these highlights fatter than your normal chunky highlight, and feel free to throw in an occasional larger "scratch".
- Mix the paint from the above step 1:1 again, then apply chunky highlight within the previous stage. Keep them scratchy still.
- Take even more Administratum Grey and mix it 1:1 with the paint from the last stage. The colour should now be similar in tone to Dawnstone . Use this pain to edge highlight everything.
- Enhance the previous stages highlights with selective highlights of pure Administratum Grey .
- Finish with very small/specular highlights of Grey Seer .
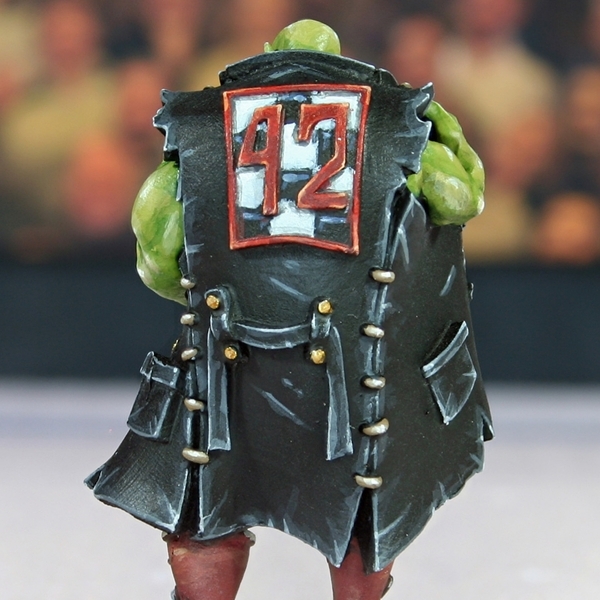 Stitching
- Basecoat with Steel Legion Drab .
- Edge highlight with Karak Stone .
- Selectively highlight with 1:1 Karak Stone and White .
- Finish with specular highlights of White .
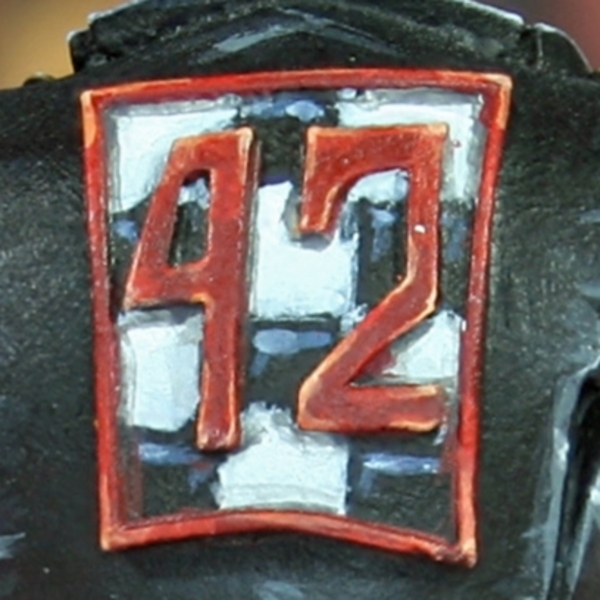 Chequered Pattern
- Basecoat with Black .
- Pick out the pattern with 1:1 Celestra Grey and White
- Shade around recesses of the white area with Administratum Grey .
- Define the recesses further with a small amount of Dawnstone .
- Highlight with small amounts of White .
- Add small highlights to the black squares with The Fang .
- Apply selective highlights of Blue Horror if/where needed.
- For the numbers and the trim, I used the same recipe as the red mushroom (but left off the spots).
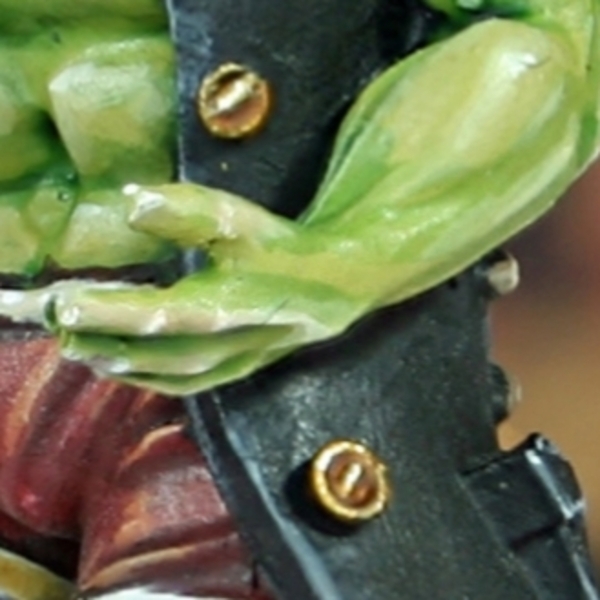 Gold Details
- Basecoat with Retributor Armour .
- Wash with Agrax Earthshade .
- Mix some Silver RLM01 Metallic into your Retributor Armour , then add some small highlights.
- While you have the Silver RLM01 Metallic on your palette, pick out the eyelets on the shoes.
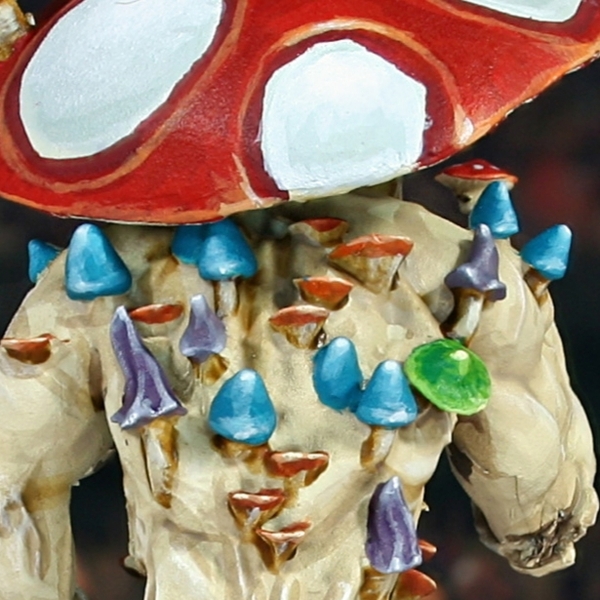 Blue Mushroom Caps
- Basecoat with Sotek Green .
- Separate touching mushrooms with a controlled wash of Drakenhof Nightshade .
- Highlight with 1:1 Ahriman Blue and Blue Horror .
- Add Selective highlights with Blue Horror .
- Add a little White to your Blue Horror and add a final highlight.
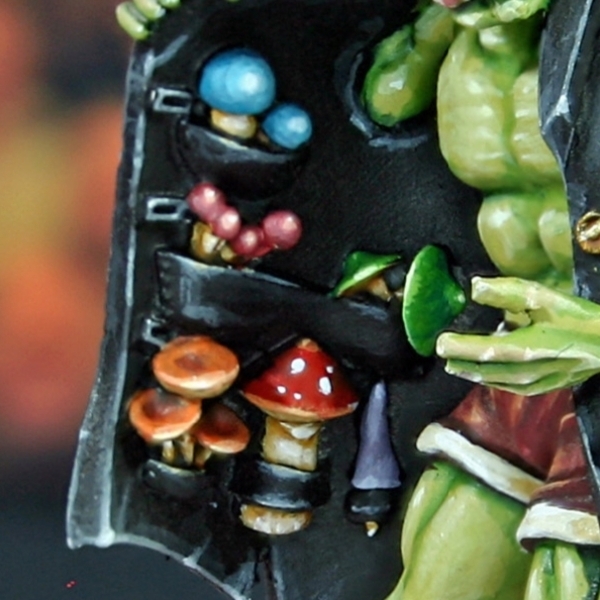 Pink Mushroom Cap
- Basecoat with 1:1 Screamer Pink and Evil Sunz Scarlet .
- Mix the base colour 1:1 with Lugganath Orange and highlight.
- Add Ice Yellow to the previous paint, in a ratio of about 1:1, then add a final highlight.
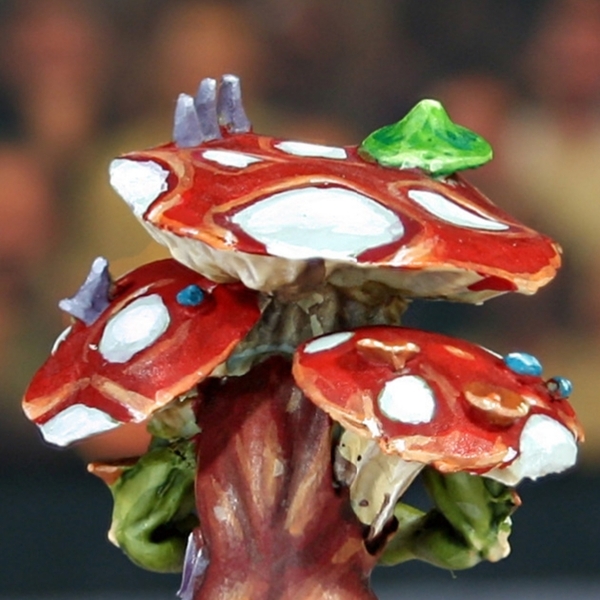 Green Mushroom Caps
- Basecoat with 2:1 Kabalite Green and Moot Green .
- Highlight with Moot Green .
- Edge highlight with 1:1 Moot Green and Ice Yellow .
- Finish with a selective highlight of Ice Yellow .
 Orange Mushroom Cap
- Basecoat with 1:2 Word Bearers Red and Troll Slayer Orange .
- Highlight with Troll Slayer Orange .
- Edge highlight with 1:1 Troll Slayer Orange and Ice Yellow .
- Finish with a selective highlight of Ice Yellow .
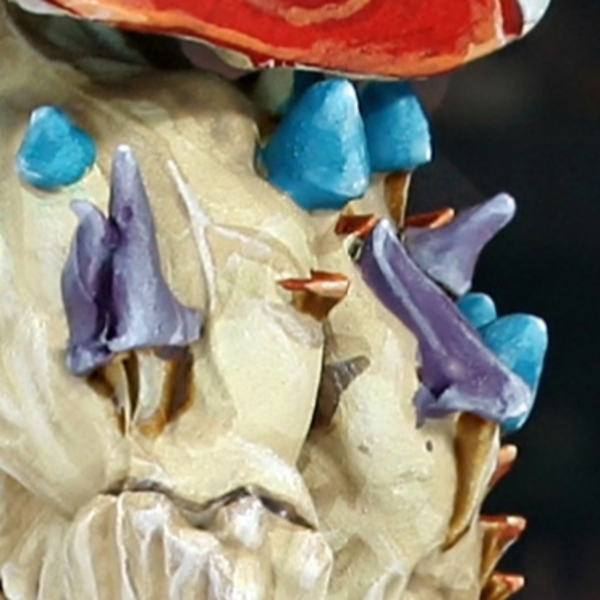 Purple Mushroom Cap
- Basecoat with Daemonette Hide .
- Separate touching mushrooms and in harsh sculpted details, with a controlled wash of Druchii Violet .
- Highlight with Warpfiend Grey .
- Selectively highlight with Slaanesh Grey .
- Mix the Slaanesh Grey 1:1 with White and add a final specular highlight.

Rookie Brushes
RookieBrushes
Aspiring miniature painter and biscuit enthusiast. Here to share my hobby and help where I can.
Citadel Painting System 56
Base 20
- Abaddon Black
- Averland Sunset
- Celestra Grey
- Daemonette Hide
- Dryad Bark
- Grey Seer
- Incubi Darkness
- Jokaero Orange
- Kantor Blue
- Khorne Red
- Mephiston Red
- Night Lords Blue
- Retributor Armour
- Rhinox Hide
- Screamer Pink
- Steel Legion Drab
- Stegadon Scale Green
- The Fang
- Wraithbone
- Zandri Dust
Shade 7
- Agrax Earthshade
- Athonian Camoshade
- Biel-Tan Green
- Coelia Greenshade
- Drakenhof Nightshade
- Druchii Violet
- Seraphim Sepia
Layer 27
- Administratum Grey
- Ahriman Blue
- Baharroth Blue
- Baneblade Brown
- Blue Horror
- Dawnstone
- Doombull Brown
- Elysian Green
- Evil Sunz Scarlet
- Fire Dragon Bright
- Kabalite Green
- Karak Stone
- Kislev Flesh
- Krieg Khaki
- Lugganath Orange
- Moot Green
- Ogryn Camo
- Pallid Wych Flesh
- Screaming Skull
- Skarsnik Green
- Slaanesh Grey
- Sotek Green
- Tau Light Ochre
- Troll Slayer Orange
- Ushabti Bone
- Warpfiend Grey
- Word Bearers Red
Technical 2
- Contrast Medium
- Lahmian Medium
Vallejo Model Air
Base 1
- 71.063 Silver RLM01 Metallic
Vallejo Model Color
Base 3
- 70.858 Ice Yellow
- 70.950 Black
- 70.951 White