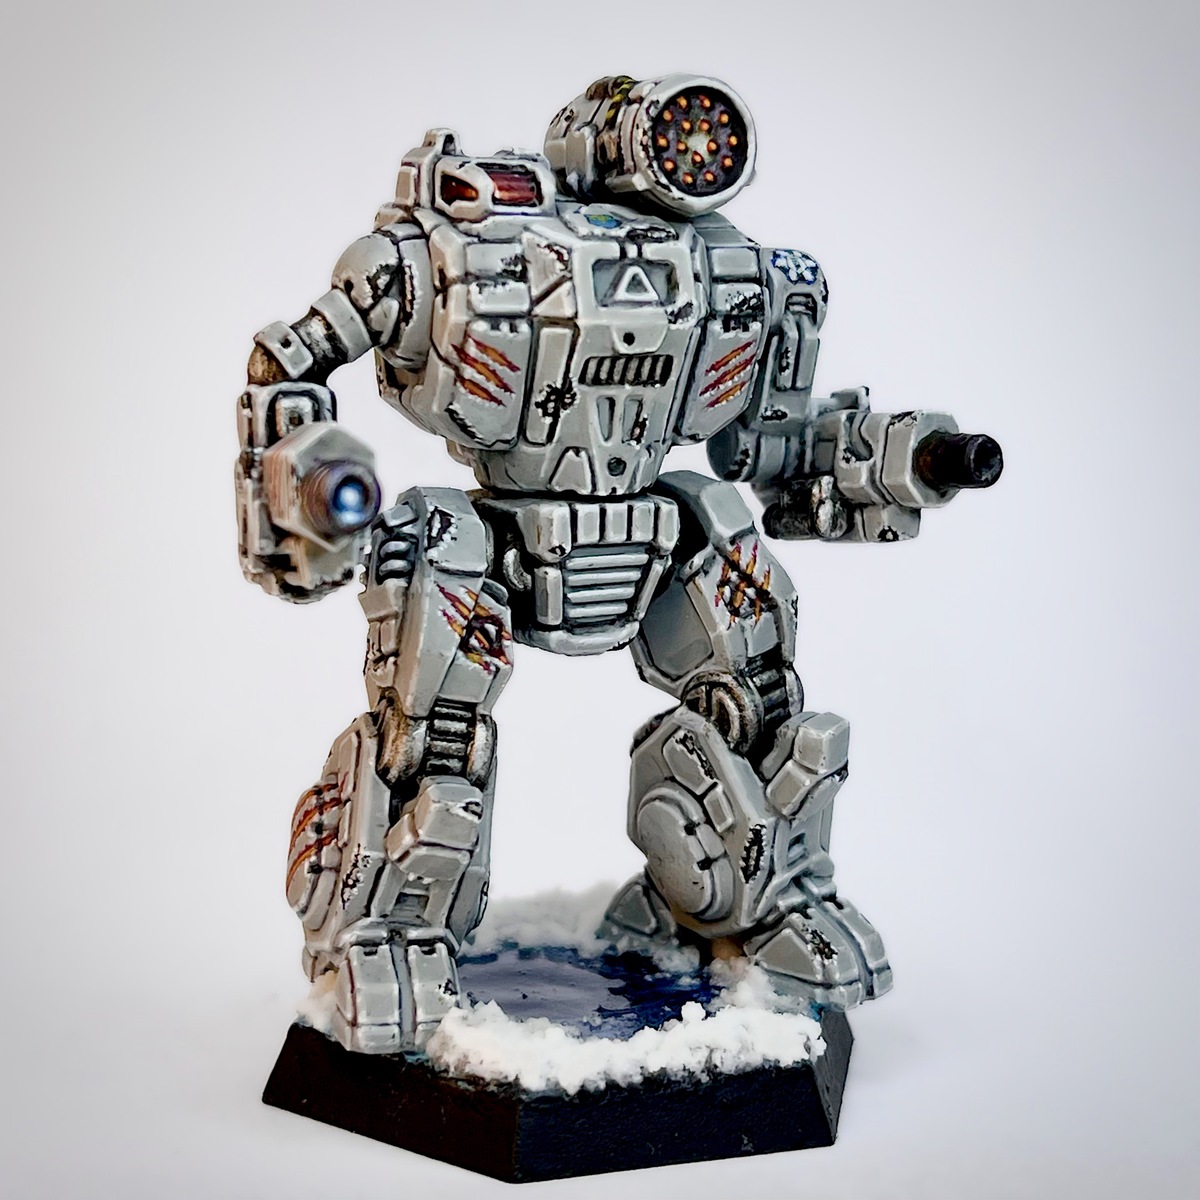

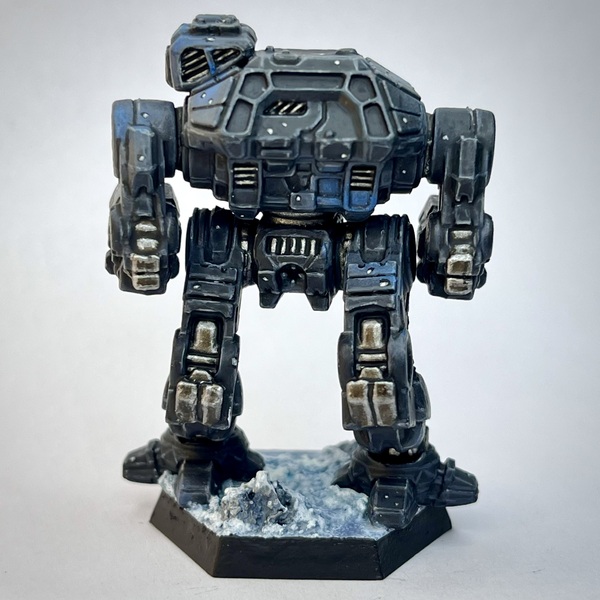
My take on the 3rd Bear Guards of Clan Ghost Bear's Alpha Galaxy. I've really come to love the Ghost Bears after spending time with them in MechWarrior 2 and 5. And their paint scheme for their Alpha Galaxy is one of my favorites in the Battletech universe.
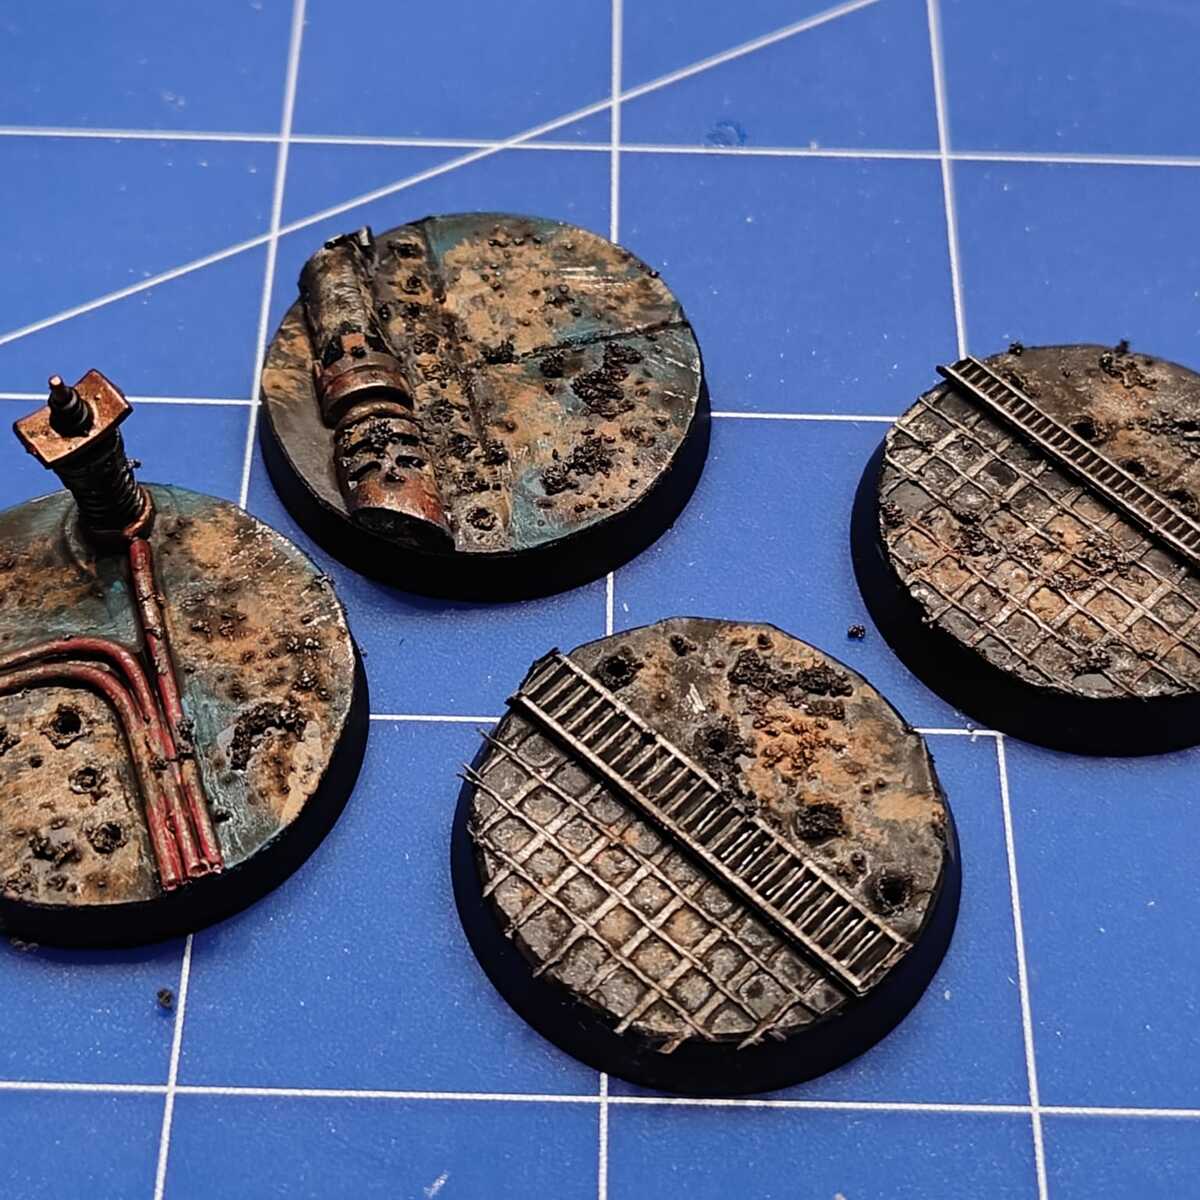
I got the idea for the snow texture on the base from this video by Painting Baron. Definitely recommend checking it out: https://youtu.be/9b4tKIedqjo?si=D_cmsAvdzziIG4l7
 Grey Armor w/ Blue "Clouds" and Stars
When working on this step, be sure to space your "clouds" out a fair bit and vary them in size. You still want the underlying black to show through in between the clouds to help them stand out.
Don't be afraid to go back to previous colors while stippling, or to tidy up a bit using the base coat. Just keep working it until you're happy with the transitions and the results.
- Prime using Mechanicus Standard Grey
- Start with a base coat of Death Reaper
- Using a dry brush or a sponge, liberally stipple Dungeon Stone Grey in random areas across the mech where you wish to create your "clouds"
- Again, using a dry brush or a sponge, stipple Wizard Grey over top of the cloud outlines from the previous step, being careful to avoid the edges and focus slightly more towards the center
- Repeat the previous step, getting closer and closer to the center each time and stippling a much smaller area, using these paints in this order: The Fang , Macragge Blue , Alaitoc Blue , Teclis Blue , and Baharroth Blue
- Once you're finished with the clouds, shade the recesses using Black Templar
- Edge highlight all over using Incubi Darkness followed by Dark Reaper
- Perform a more selective edge highlight using Dawnstone
- Finish up the highlights by picking out the sharpest edges and corners using Administratum Grey
- Begin adding stars by painting dots of varying sizes in random locations across the model using Doom Death Black
- Apply a dot of Carcharodon Grey to the center of the star, being sure to leave some of the black showing around the edges
- Apply an even smaller dot of Trooper White to the very center of the star
- Finally, apply a very tiny amount of Bold Titanium White to the very center of the star
 Cockpit Canopy Glass
I definitely recommend using a wet palette with this step to keep your paints wet. If you're having trouble with blending the transitions, using Lahmian Medium in place of water for thinning your paints might help them flow better and stay wet longer on the model.
- Base coat the canopy glass using a 1:1 mix of Gal Vorbak Red and Doom Death Black
- Shade the deepest recesses of the canopy using Black Templar
- Starting the top left corner and working your way down to just above the bottom right corner, apply a very thin coat of Gal Vorbak Red
- Repeat the previous step, staying nearer and nearer to the top left corner with each step using, in order: Khorne Red , Mephiston Red , Evil Sunz Scarlet l, and Fire Dragon Bright
- Using a thin coat of :Citadel/FireDragonBrighor, paint an L shape in the top left corner
- Repeat the previous step, this time making the L much smaller using Flash Gitz Yellow
- Apply a single dot of Bold Titanium White in the top left and bottom right corners
 Joints and Vents
- Base coat using Dwarven Iron
- Apply one to two washes of Agrax Earthshade
- Shade the recesses using Black Templar
- Edge highlight using Leadbelcher
- Apply a more selective edge highlight using Runefang Steel
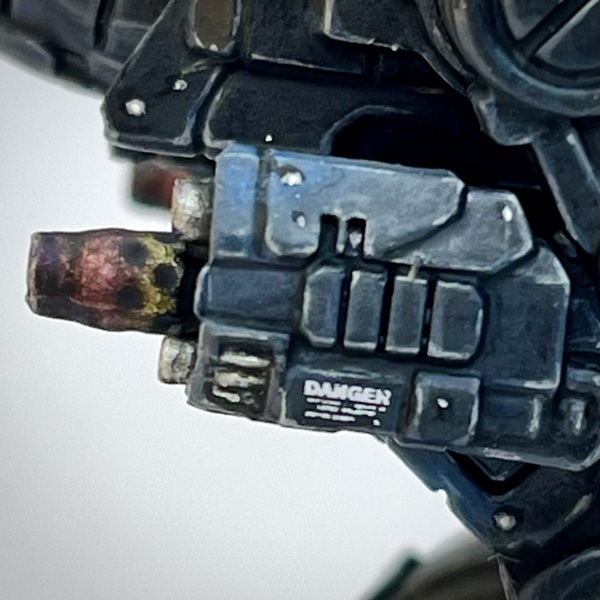
 Missile Launcher
- Base coat using Dwarven Iron
- Apply a wash of Agrax Earthshade
- Shade the recesses using Black Templar
- Apply a wash of Seraphim Sepia
- Apply a second wash, this time avoiding the center of the launcher, using Druchii Violet
- Apply a final wash, this time keeping to the edges of the launcher, using Drakenhof Nightshade
- Apply a very light dry brush of Dwarven Iron to the very center of the launcher to lighten it up a bit
- Repeat the previous step, this time making sure that there is very little paint on your brush, using Leadbelcher followed by Runefang Steel
- Apply a small amount of Nuln Oil around each of the missles
- Base coat the missiles using Gal Vorbak Red
- Apply a layer of Khorne Red all over the missiles while being careful to avoid the base/recesses
- Apply a layer of Evil Sunz Scarlet to the tip of the missiles
- Apply a layer of Wild Rider Red to tip of the missiles
- Apply a thin layer of Fire Dragon Bright to the very tip of the missiles
- Apply a very tiny amount of Flash Gitz Yellow to the very tip of the missiles
 Autocannons
- Base coat using Dwarven Iron
- Wash the metal using 1 to 2 coats of Agrax Earthshade
- Shade about 3/4 of the autocannons, starting from the muzzle, using Seraphim Sepia
- Shade about half way down the autocannons, starting at the muzzle, using Druchii Violet
- Shade the muzzle and just past the muzzle using Drakenhof Nightshade
- Shade the recesses, including the interior of the barrel and the small ports/vents in the barrel, using Black Templar
- Add some very light highlights around the muzzle using Runefang Steel
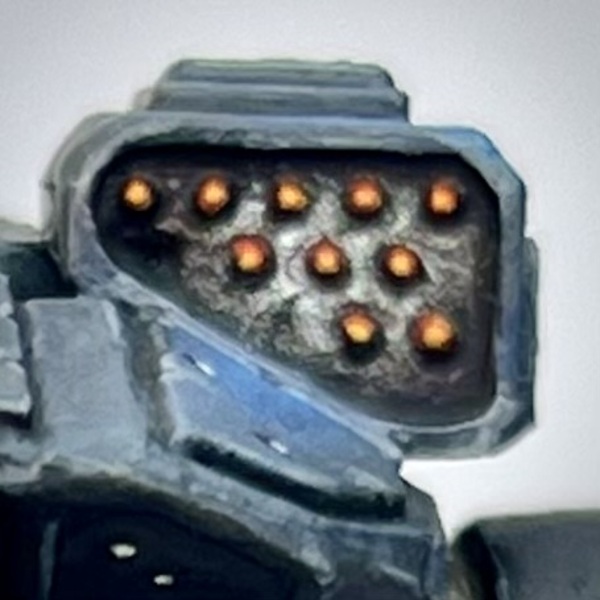
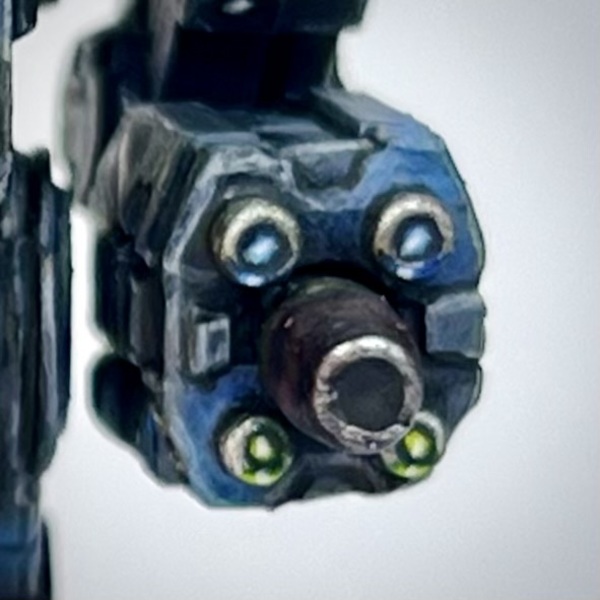 Lasers
- Base coat the lasers using Dwarven Iron
- Shade the metal using Agrax Earthshade
- Shade the recesses using Black Templar
- For the top lasers (Clan ER Large Lasers), apply a mix of 1:1 Kantor Blue and Doom Death Black to the center
- Follow up with a thin coat of Kantor Blue , being careful to avoid the edges
- Apply a small amount of Teclis Blue to the center
- Apply a small amount of Baharroth Blue to the very center
- Apply a small dot of Bold Titanium White to the very center
- Repeat the above steps on the metal rim of the top lasers, right on the center-bottom, to create a glow
- For the bottom lasers (Clan ER Medium Lasers), apply a 1:1 mix of Caliban Green and Doom Death Black to the center
- Follow up with a thin coat of Caliban Green , being careful to avoid the edges
- Apply a small amount of Warpstone Glow to the center
- Apply a small amount of Moot Green to the very center
- Apply a small amount of Flash Gitz Yellow to the very center
- Apply a very small dot of Bold Titanium White to the very center
- Repeat the above steps on the metal rim of the bottom lasers, right on the center-bottom, to create a glow
- Highlight the metal using Runefang Steel
- Apply a small amount of Aluminum to the very top of the metal rims
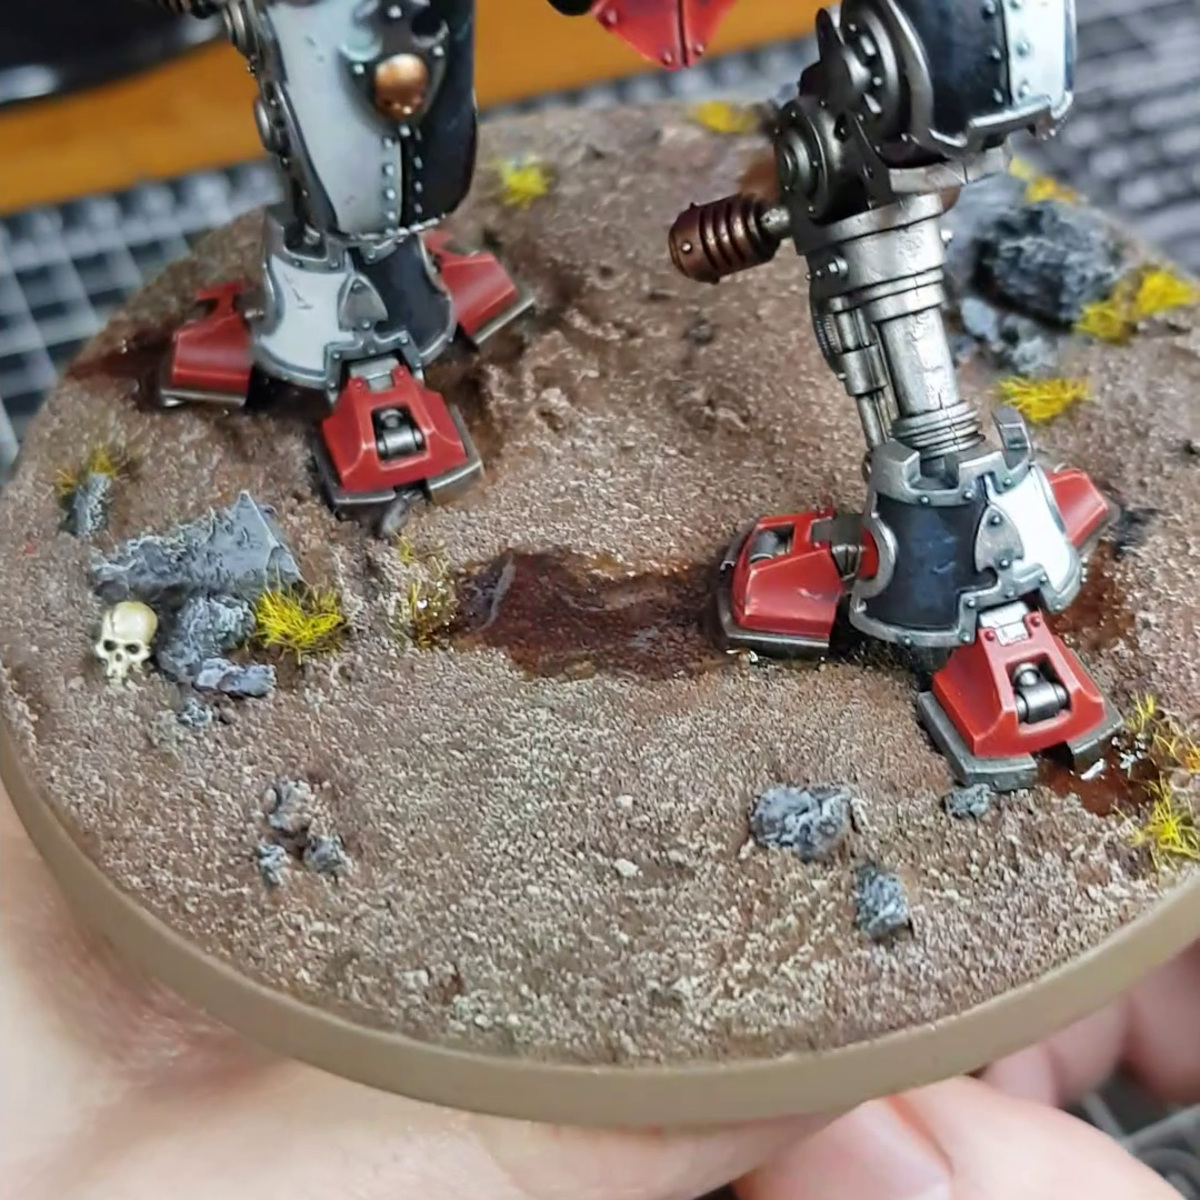
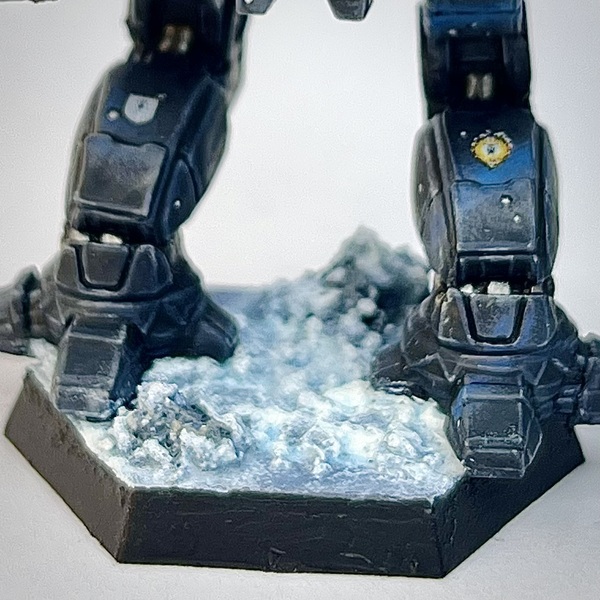 Snowy Base
The snow texture mixture isn't an exact science. Feel free to play around with it to get a consistency you like.
The washing soda can be replaced with snow texture if you have it. I use both the washing soda and baking soda for some variation in texture.
I use white ink here. But you can substitute that with a mixture of Bold Titanium White (or another pure white) and airbrush paint thinner or Lahmian Medium . Just mix them in a separate cup before adding to the dry ingredients.
- Base coat the base using The Fang
- Base coat the rocks using Wizard Grey
- Shade the rocks using Agrax Earthshade
- Shade the rocks again using some Drakenhof Nightshade
- Lightly dry brush the rocks using Dungeon Stone Grey
- Lightly dry brush the rocks again using Wizard Grey
- Apply a final highlight to the rocks by lightly dry brushing on some Carcharodon Grey
- In a small cup, mix roughly equal parts washing soda, baking soda, and PVA glue. Add some Titanium White ink and stir until you get a sort of gritty toothpaste-like consistency. Apply all over the base, leaving small patches untouched, and being sure to apply to the tops of the rocks. Let dry for 12+ hours.
- For some thicker/heavier snow, add some Valhallan Blizzard in small patches around the base, such as up against the rocks or up against the mech's feet.
- Shade all of the snow using Talassar Blue
- Shade the deepest recesses around the base using Drakenhof Nightshade
- Using some heavily thinned down Bold Titanium White , highlight the very tips of the snow piles
- Paint the rim using Doom Death Black

Sabrina Fay
FayDayParade
I paint little plastic dudes.
Amsterdam Acrylic Ink
Base 1
- 105 Titanium White
Citadel Painting System 32
Base 9
- Caliban Green
- Gal Vorbak Red
- Incubi Darkness
- Kantor Blue
- Khorne Red
- Leadbelcher
- Macragge Blue
- Mephiston Red
- The Fang
Shade 5
- Agrax Earthshade
- Drakenhof Nightshade
- Druchii Violet
- Nuln Oil
- Seraphim Sepia
Layer 13
- Administratum Grey
- Alaitoc Blue
- Baharroth Blue
- Dark Reaper
- Dawnstone
- Evil Sunz Scarlet
- Fire Dragon Bright
- Flash Gitz Yellow
- Moot Green
- Runefang Steel
- Teclis Blue
- Warpstone Glow
- Wild Rider Red
Technical 1
- Lahmian Medium
Texture 1
- Valhallan Blizzard
Spray 1
- Mechanicus Standard Grey
Contrast 2
- Black Templar
- Talassar Blue
Monument Hobbies Pro Acryl
Base 1
- 001 Bold Titanium White
Two Thin Coats 7
Shade 2
- Doom Death Black
- Wizard Grey
Midtone 2
- Carcharodon Grey
- Death Reaper
Highlight 2
- Dungeon Stone Grey
- Trooper White
Metallic 1
- Dwarven Iron
Vallejo Metal Color
Base 1
- 77.701 Aluminum