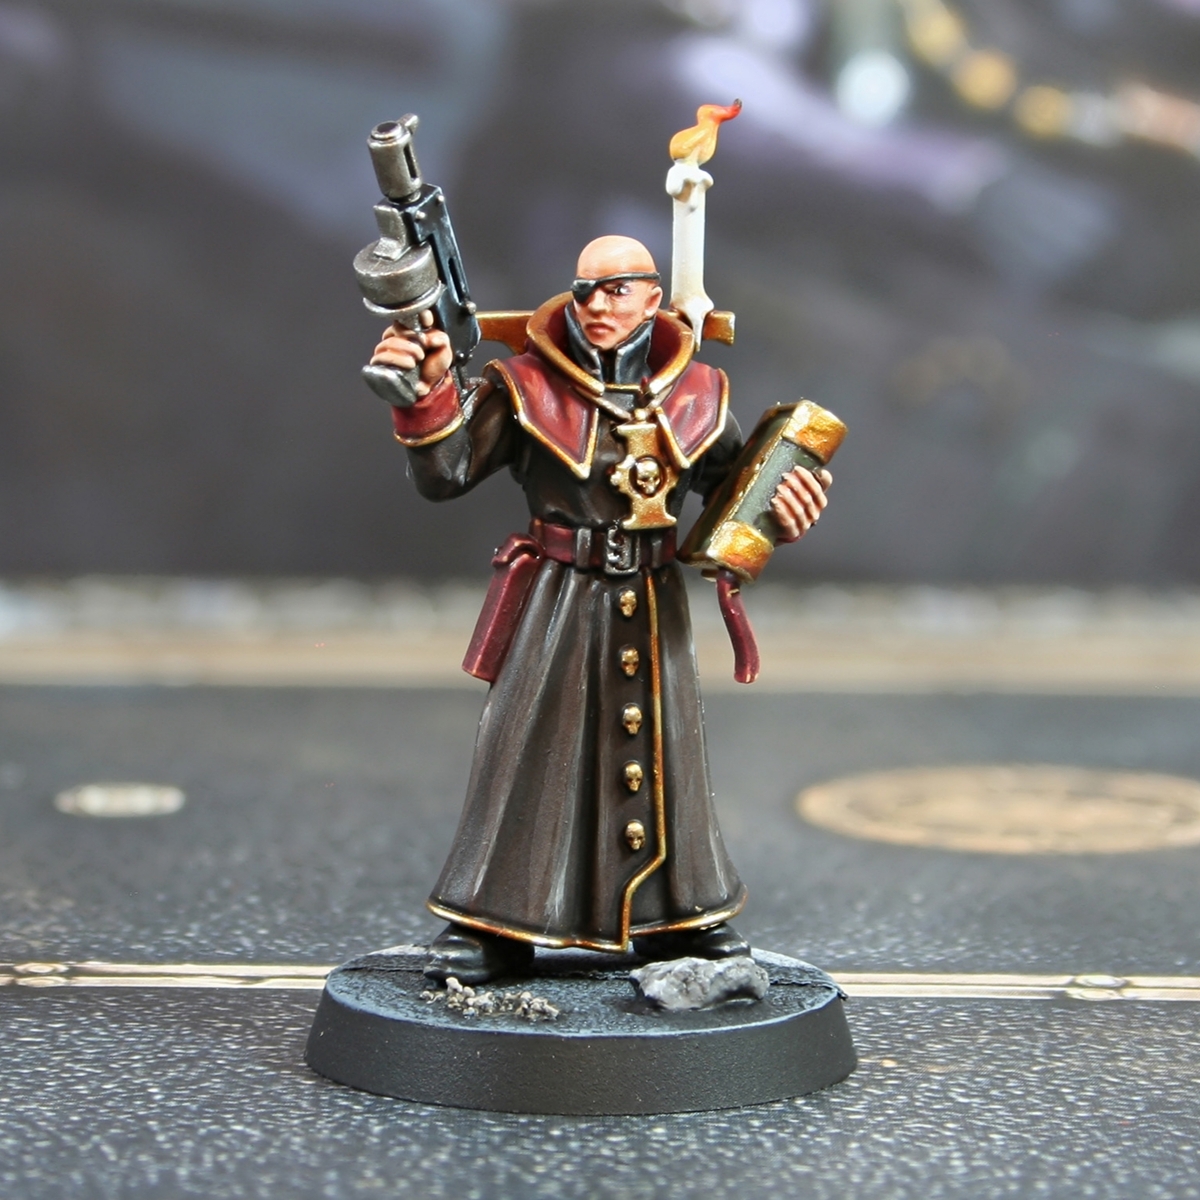
Inquisition: Interrogator Agent

Leather Coat
- Basecoat with Dryad Bark & Abaddon Black , mixed 1:1.
- Shade the recesses with Abaddon Black .
- Add chunky highlights of Dryad Bark .
- Now add smaller highlights of Stormvermin Fur within the last stage.
- Selectively highlight small areas with 1:1 Stormvermin Fur and Deepkin Flesh .
- Finish with dots of Deepkin Flesh .
Red Lining
- Basecoat with Khorne Red .
- Shade recesses with a thin mix of 1:1 Khorne Red and Incubi Darkness .
- Glaze highlight with Mephiston Red .
- Now mix increasing amount of Tau Light Ochre into your Mephiston Red , making the highlights smaller and smaller with each pass.
- Finish off with a few select dots of Tau Light Ochre .
Light Gold
- Basecoat with a 3:1 mix of Vallejo Metal Color Gold and Copper .
- Wash with Reikland Fleshshade .
- Shade around recessed and in deep recesses with 1:1 Doombull Brown and Abaddon Black .
- Pick out highlights with Gold
- Fine highlights with Vallejo Model AIr Silver RLM01 Metallic .
Warm Gold
- Basecoat with Retributor Armour .
- Glaze shading in, using Gore-grunta Fur .
- If you need to darken the shading, mix some Rhinox Hide into it and do another (more selective) pass.
- Mix increasing amounts of Vallejo Model AIr Silver RLM01 Metallic into your base mix and add some highlights. Ideally, you will finish with specular highlights of pure Silver RLM01 Metallic .
Red Leather
- Basecoat with a 1:1 mix of Khorne Red and Abaddon Black .
- Chunky highlights of Khorne Red .
- Mix an equal amount of Squig Orange into your Khorne Red and apply fine edge highlights.
- Sepectively highlight corners and exposed edges with pure Squig Orange .
- Finish off with a few dots of Ungor Flesh in relevant places.
Caucasian Skin
- Basecoat with an equal parts mix of Cadian Fleshtone , Kislev Flesh and White Scar .
- Wash with Reikland Fleshshade .
- If any points need estra shading, I would recommend using some thing Doombull Brown .
- Re-establish the basecoat where needed, then mix increasing amounts of White Scar into it, highlighting up raised points.
Black Leather
- Basecoat with Abaddon Black .
- Glaze raised areas with a 1:1 mix of Abaddon Black and Skavenblight Dinge .
- Chunky Highlights of Skavenblight Dinge .
- Fine highlights of Stormvermin Fur .
- Selective highlights of Karak Stone .
- Mix a little White Scar into your Karak Stone and add a few specular highlights, where light would really hit.
Green Leather
- Basecoat with Castellan Green .
- Mix the Castellan Green with an equal amount of Rhinox Hide , thin it and then run it into recesses.
- Apply chunky highlights of 2:1 Loren Forest and Deathworld Forest .
- Add fine highlights of Straken Green .
- Finally, apply a small highlights of Krieg Khaki where needed.
Candle
- Basecoat with Corax White .
- Shade recesses with thinned Karak Stone .
- Run thin lines of Baneblade Brown into deep recesses.
- Mix the Corax White 1:1 with White Scar and add highlights to the raised details.
- Finish with small highlights of pure White Scar .
Flame
- Basecoat with Averland Sunset .
- Glaze from the midpoint, pulling paint towards the tip. As I worked up the flame I went redder and redder with my paints, mixing in a little black for the final highlight. The paints I used were Fire Dragon Bright , Troll Slayer Orange , Wild Rider Red , Evil Sunz Scarlet and Abaddon Black .
- Now run glazes towards the lowest point, where the flame would be burning the wixk. The paints I used were : Yriel Yellow , Flash Gitz Yellow , Dorn Yellow and White Scar .
Steel
- Basecoat with Leadbelcher .
- Wash with Nuln Oil .
- Highlight with Ironbreaker .
- Finish with small amounts of Vallejo Model Air Silver RLM01 Metallic or Stormhost Silver (if you are a GW purist).
Weapon Casing
- Basecoat with Abaddon Black .
- Edge highlight everything with a thick line of Dark Reaper .
- Highlight everything again, this time with a thin line of Thunderhawk Blue . This colour is a good place to put in some scratches too.
- With Fenrisian Grey , selectively highlight upward facing edges, corners and prominent edges. Stick primarily to edges where the light would hit and always drag your brush towards the brightest point. If you added scratches previously, reinforce them with a smaller, thinner line underneath.
- Finally, edge add small highlights to the centre of the previous highlights and corners with Blue Horror . Try to make them very small, dots if at all possible.

Rookie Brushes
RookieBrushes
Aspiring miniature painter and biscuit enthusiast. Here to share my hobby and help where I can.
Citadel Painting System 43
Base 12
- Abaddon Black
- Averland Sunset
- Castellan Green
- Corax White
- Deathworld Forest
- Dryad Bark
- Incubi Darkness
- Khorne Red
- Leadbelcher
- Mephiston Red
- Retributor Armour
- Rhinox Hide
Shade 2
- Nuln Oil
- Reikland Fleshshade
Layer 28
- Baneblade Brown
- Blue Horror
- Cadian Fleshtone
- Dark Reaper
- Deepkin Flesh
- Doombull Brown
- Dorn Yellow
- Evil Sunz Scarlet
- Fenrisian Grey
- Fire Dragon Bright
- Flash Gitz Yellow
- Ironbreaker
- Karak Stone
- Kislev Flesh
- Krieg Khaki
- Loren Forest
- Skavenblight Dinge
- Squig Orange
- Stormhost Silver
- Stormvermin Fur
- Straken Green
- Tau Light Ochre
- Thunderhawk Blue
- Troll Slayer Orange
- Ungor Flesh
- White Scar
- Wild Rider Red
- Yriel Yellow
Contrast 1
- Gore-grunta Fur
Vallejo Metal Color
Base 2
- 77.710 Copper
- 77.725 Gold
Vallejo Model Air
Base 1
- 71.063 Silver RLM01 Metallic