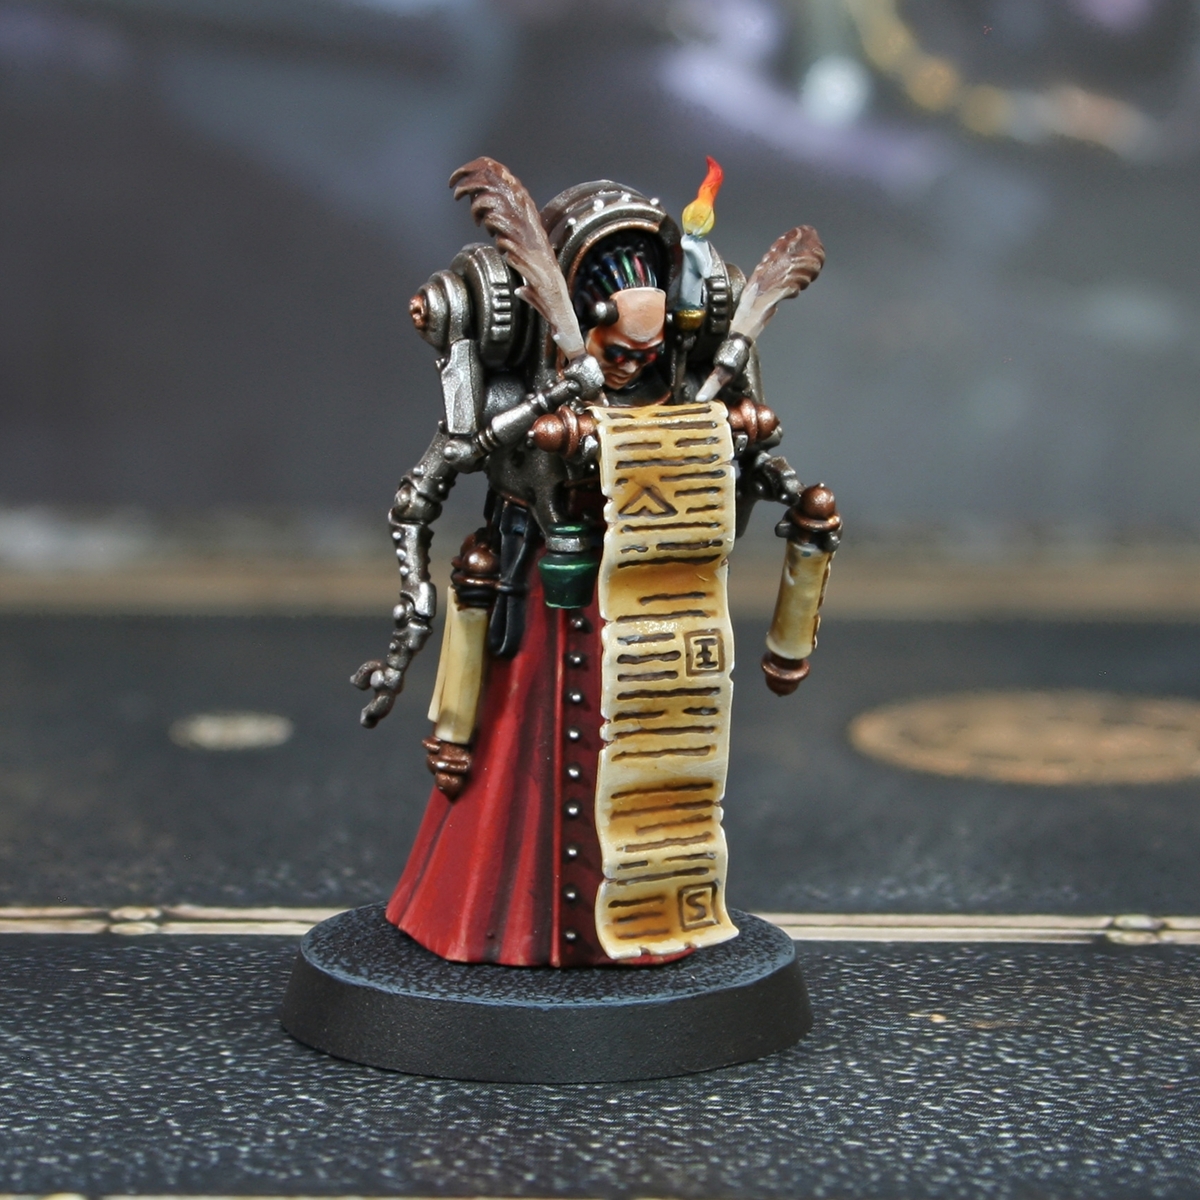
Inquisition: Autosavant Agent
How I painted the Autosavant for my Inquisitorial Agents Kill Team. I tried to stick mostly to the box art for this one.
Skin
- Basecoat with a mix of Two parts Cadian Fleshtone , 1 part White & 1 parts Screaming Skull . You could just use Kislev Flesh if you wanted, but I like the tone and coverage of this mix.
- Wash with Reikland Fleshshade . I had to go back in with Reikland Fleshshade and add a second layer on the temples when it was dry too. You could even use some thinned Doombull Brown , if you fancied.
- Now gradually add more White yo the colour used for your basecoat, then highlight smaller and smaller. I did this in roughly three stages, ending with small highlights of nearly pure White .
Red Cloth
- Basecoat with an equal parts mix of Khorne Red , Wazdakka Red & Evil Sunz Scarlet .
- Shade with some thin Abaddon Black & Khorne Red , mixed 1:2.
- Where you want to add extra definition, shade the deep recesses with a small amount of pure Abaddon Black .
- Add chunky highlights to folds with Evil Sunz Scarlet .
- Apply fin highlights with Evil Sunz Scarlet , Ungor Flesh & Ushabti Bone , mixed 2:1:1.
- Selectively highlight with Evil Sunz Scarlet , Ungor Flesh & Ushabti Bone , mixed 2:1:1. The increased amount of Ungor Flesh should make it look much more orange.
- Finish with a few pure Ungor Flesh specular highlights.
Parchment
- Basecoat with Ushabti Bone .
- Wash with Seraphim Sepia .
- Deep shade recesses with thinned Rhinox Hide .
- At this point I picked out the text with 1:1 Rhinox Hide and Abaddon Black . I thinned this quite a lot and added a small amount of flow improver to help it run into the detail.
- Re-apply Ushabti Bone in areas where you want to highlight.
- Add fine highlights of Screaming Skull .
- Selectively highlight with 1:1 Screaming Skull and White .
- Finish with specular highlights of White .
Black Leather Belt
- Basecoat with Black .
- Paint chunky highlights of Incubi Darkness onto raised details.
- Mix the Incubi Darkness 1:1 with Deepkin Flesh and add fine highlights onto edges.
For the various tassels that hang from the belt, also basecoated them Black , then edge highlighted with Stormvermin Fur . I enhanced the volumes with smaller highlights, by taking Ice Yellow and mixing it into my Stormvermin Fur . This should set the two materials apart nicely.
Steel
- Basecoat with Leadbelcher .
- Wash with Nuln Oil .
- Glaze some Agrax Earthshade or a brow of yourchoice into areas you want to look darker.
- Edge highlight with Ironbreaker .
- Add fine highlights with small amounts of Vallejo Model Air Silver RLM01 Metallic .
Brass
- Basecoat with Balthasar Gold .
- Shade with Agrax Earthshade .
- Highlight with Hashut Copper
- Selectively highlight with a mix of Hashut Copper and Silver .
- Finish with a specular highlight of Silver RLM01 Metallic .
Quills
- Basecoat with Rakarth Flesh .
- Glaze Baneblade Brown over the majority of the quill. I covered roughly the top three quarters, dragging my brush upwards.
- Repeat the above step with Gorthor Brown , covering roughly half.
- Finish the gragiant with a glaze of Rhinox Hide , this time covering the top quarter.
- To highlight the feather, I simply mixed some Wraithbone into whatever colour that part of the feather was, and tried to pick out the edges. you could even pick out occasional specular highlights with a greater amount of Wraithbone in the mix, if you wanted.
- I finished by glazing a small amount of Reikland Fleshshade over the feather, adding warmth and tying the colours together. I dragged my brush in the same upwards motion, but also pulled it towards the "spine" of the feather, to concentrate pigment there.
Candle
- Basecoat with Corax White .
- Wash with Apothecary White .
- Enhance the shading in deep recesses with small amount of Dark Reaper .
- Finally, pick out raised details with White .
Flame
This is a small detail, but quite complex. My steps here are quite loose, but the general rule is the closer to the source of the flame the more white/yellow the paint and at the furthest point, make it more orange/red.
- Basecoat with Averland Sunset .
- Mix some Ice Yellow (or Dorn Yellow ) into your base colour and glaze towards the bottom half.
- With Fire Dragon Bright , glaze the top half of the flame.
- In the recessed details in the bottom half, run in some Ice Yellow in, brightening the colour.
- Enhance this effect with a very small amount of White close to where the wick would be.
- Now glaze Evil Sunz Scarlet on raised details towards the tip of the flame.
If you are unhappy with how smooth the transitions are or vibrant the colours, I would recommend additional glazes of Yellow Fluorescent towards the bottom and Orange Fluorescent in the middle section.
Bottles
- Basecoat the green one with 1:1 Abaddon Black and Caliban Green , the the blue one with Abaddon Black and Stegadon Scale Green .
- Now add chunky highlights of Caliban Green and Stegadon Scale Green to the relevant bottle.
- Now gradually add Ice Yellow to the previous highlight colour and highlight smaller and smaller, until you are adding pure Ice Yellow as specular highlights.
- On the green bottle, I wasn't super happy with its vibrancy, so I finished it off with a glaze of Green Fluorescent . I was fine with the blue looking a bit more desaturated though.

Rookie Brushes
RookieBrushes
Aspiring miniature painter and biscuit enthusiast. Here to share my hobby and help where I can.
Citadel Painting System 34
Base 12
- Abaddon Black
- Averland Sunset
- Balthasar Gold
- Caliban Green
- Corax White
- Incubi Darkness
- Khorne Red
- Leadbelcher
- Rakarth Flesh
- Rhinox Hide
- Stegadon Scale Green
- Wraithbone
Shade 4
- Agrax Earthshade
- Nuln Oil
- Reikland Fleshshade
- Seraphim Sepia
Layer 17
- Baneblade Brown
- Cadian Fleshtone
- Dark Reaper
- Deepkin Flesh
- Doombull Brown
- Dorn Yellow
- Evil Sunz Scarlet
- Fire Dragon Bright
- Gorthor Brown
- Hashut Copper
- Ironbreaker
- Kislev Flesh
- Screaming Skull
- Stormvermin Fur
- Ungor Flesh
- Ushabti Bone
- Wazdakka Red
Contrast 1
- Apothecary White
Vallejo Model Air
Base 1
- 71.063 Silver RLM01 Metallic
Vallejo Model Color 7
Base 3
- 70.858 Ice Yellow
- 70.950 Black
- 70.951 White
Metallic 1
- 70.997 Silver
Fluorescent 3
- 70.730 Yellow Fluorescent
- 70.733 Orange Fluorescent
- 70.737 Green Fluorescent
