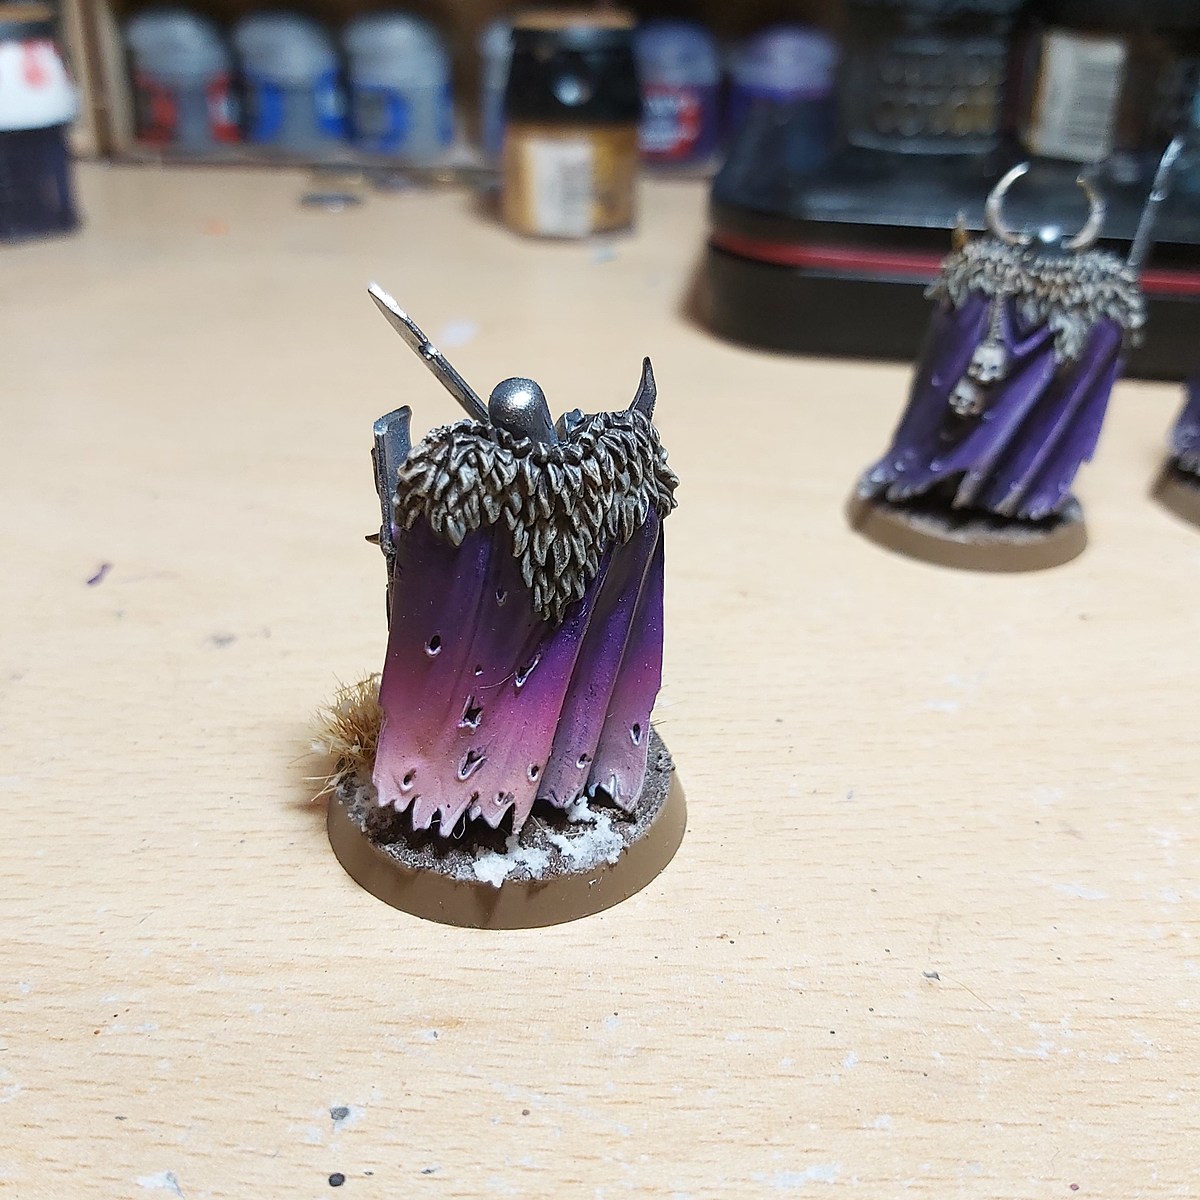
This is a reminder to myself of my current method of painting Salamanders; I'll probably tweak it as I go as I discover ways to achieve the same effects more efficiently; There's a lot of models to get through! This is an attempt to paint to a high tabletop standard; I'm not aiming to just get the models done as quickly as possible, and I want to enjoy the process and have an army to be proud of.
I'll add photos later on, as some of the descriptions below might not be entirely clear.
As is usual with my methods, this may be wildly overcomplicated and use a lot of different paints, but I can't resist experimenting with new toys!
Basing
- Break some cork into small pieces (~2-3mm) and glue a few to the base. Try to vary it model to model and avoid too much in the way of symmetry.
- Glue a few small fragments of slate on some to add variety.
- Make a paste of roughly equal parts PVA glue, sand, baking soda and paint (any will do, just use something cheap or that you're trying to use up!). Apply this roughly to the base, varying the amount/depth. It's normal for there to be some bubbles in the mix, and these will pop as it dries. It will also shrink somewhat as it dries, so you may want to add a second or third coat to vary the finish. Don't be afraid of getting some paste on the cork or stone, it'll just bring all the elements together.
Airbrush
Obligatory comment: This can probably be done without an airbrush, but it certainly makes it easier! A rattlecan prime followed by a series of very soft drybrushes from above should do. All paints, except the primer, are diluted about 1:1 with Airbrush Thinner . I tend to do each of the steps twice with thinner paint, perhaps covering a little less on the second pass to give a subtler transition. This can also help to reduce the 'airbrushed' look if you're worried about that sort of thing!
All paints, except the primer, are diluted about 1:1 with Airbrush Thinner . I tend to do each of the steps twice with thinner paint, perhaps covering a little less on the second pass to give a subtler transition. This can also help to reduce the 'airbrushed' look if you're worried about that sort of thing!
I'm trying to focus the highlights on the important parts of the model, so instead of highlighting the whole thing to the same level I add more brightness to the head, shoulders and so on. This makes the model more readable, and naturally guides the eye.
- Prime the model black. I use Molotow One4All Signal Black, but any will do.
- Spray from above and the side with Heavy Black Green . You want to cover most of the model, leaving the recesses and underside black.
- Spray from above to about a 45 degree angle with Warpstone Glow . Add a second layer covering just the top two-thirds of the model. You may even want to do a third layer; this paint has about the worst coverage of any I use!
- Spray from above to about a 30 degree angle with Moot Green , focusing more on the top third of the model, and more on the front than the back. If you're feeling clever, you can try picking out some volumes at this stage.
Green Armour
- OPTIONAL: If you're anything like me, you're not quite good enough with the airbrush to fully highlight all the volumes of the model. At this stage, I use Sap Green and Spring Green to add highlights and shadows to emphasise the shapes of specific pieces that zenithal airbrushing doesn't pick up. These paints blend very easily to smooth transitions and slightly shift the tone in a way I like, but feel free to use the colours used in the airbrush stages, or to skip this entirely!
- Begin edge highlighting the armour panels with Irati Green
- Add a second edge highlight with Moot Green At this point, focus more on upwards-facing surfaces, and those further up the model.
- Add a final edge highlight with Livery Green , focussing on just the higher surfaces of the model.
- For a little more contrast, you can add some final tiny highlights and spots of reflection with Yellow Green (70.954)
- If you think your highlights are a bit stark, you can glaze over them, either using the poor coverage of Warpstone Glow to your advantage, or using something like the old Waywatcher Glaze from citadel or Emerald . I really like the Warcolours inks for glazing, they're completely transparent and really enrich the tones. If you're struggling with glazing, give them a go.
Black Armour
- Basecoat the black armour with Heavy Charcoal
- Paint a layer of Eclipse Grey over most of the area.
- Add an equal amount of Graphite to the Eclipse Grey and add a further layer
- Add another highlight with 2:1 Graphite : Eclipse Grey
- Add an edge highlight with Graphite
- As these grey paints can be a little chalky, I glaze over the transitions with thinned Nuln Oil or any thinned black paint or ink.
- Optional: I like to try and liven up black armour by adding a gentle reflected colour in the areas facing the ground. In this case I glazed Arbuckles Brown onto the downwards facing areas for a warm shadow. For a cold shadow try a dark intense blue
Undersuit/Armour Seals
- Basecoat the undersuit with Stormvermin Fur
Cables
- Basecoat cables with Petroleum Gray
- Highlight the cables with Warpfiend Grey
- Add a final highlight to the cables with Slaanesh Grey
Weapon Casings
- Basecoat with Dark Reaper
- Highlight the volumes and add an edge highlight with Thunderhawk Blue
- Add another edge highlight on the upwards-facing edges with a 1:1 mix of Thunderhawk Blue : Glacier Blue
Steel/Gunmetal
- Basecoat with Gunmetal Grey
- Add an edge highlight with a 1:1 mix of Gunmetal Grey : Dark Aluminum
Wash
- At this stage I use an oil wash to recess shade all the armour and weapon casing, and as an all-over wash on the metal, cables and undersuit. This is black oil paint mixed 1:2 with white spirit. If you don't want to use oils: you can do the recess shading and undersuit with Black Templar or two/three coats of Nuln Oil or similar. For the metal, I'd advise not using a shade or contrast paint; a black ink would be better if you can get one.
- After a few minutes, you can use a cotton bud or small sponge to clean up any wash that's gotten where you don't want it, and to remove it from the highest areas of the metal. A thin oil wash should only take half an hour to dry. You DON'T need to varnish before or afterwards, but you can if you like
Flame Designs
- Start by painting some 's' shapes with Balor Brown . Don't go over the top - less is more here, and not every model needs them!
- Add further layers of Balor Brown to build the opacity, thickening some areas of the design.
- Gradually mix Mephiston Red into the Balor Brown , painting less and less of the design each time.
Battle Damage
- If you're going to use transfers/decals, it makes sense to do it before any battle damage so the designs look like part of the armour. I tend to use Decal Fix and Decal Softener to apply them and then add a layer of Ultra Matte Varnish over the top to even out the finish.
- Using a small piece of sponge and a pair of tweezers to roughly apply some Rhinox Hide over the armour. How much is up to you! I don't like to go too heavy, and try to keep each individual spot small, or it looks unrealistic.
- Highlight the underside of the chips with Moot Green and Graphite for the green and black armour respectively
Undersuit/Armour Seals
- Add a simple highlight with Stormvermin Fur
Leather
- Basecoat the leather with Black Leather
- Add scratchy highlights by gradually mixing Deck Tan into the Black Leather
- Glaze over the leather with a brown ink; I use Liquitex Transparent Raw Umber.
Purity Seals
- Basecoat the parchment with Arabic Shadow . This may need two coats.
- Highlight with Zandri Dust
- Highlight with a 1:1 mix of Zandri Dust and Ushabti Bone
- Add a final highlight with Ushabti Bone
- Wash with Seraphim Sepia diluted 1:1 with Lahmian Medium .
- Add a recess shade and emphasise shadows with Burnt Umber . You can also add squiggles with this to represent writing on the parchment.
- Basecoat the wax with Bloodfest Crimson
- Highlight with Wazdakka Red
- Add a final highlight by mixing some Deck Tan : into the Wazdakka Red
Gold
- Basecoat the gold with a 1:1 mix of Retributor Armour and Hull Red
- Layer over most of it with pure Retributor Armour
- Highlight the gold with Liberator Gold
- Add a final highlight with Gold :
- Emphasise the shadows with Sepia
- Wash the gold with Reikland Fleshshade
Eye Lenses
- Basecoat the lenses with Mephiston Red
- Layer with Wild Rider Red
- Add a line of Troll Slayer Orange towards the bottom and front of the lenses
- Add a smaller line of Flash Gitz Yellow inside the orange one
- Add a tiny dot of Bold Titanium White at the back top corner of the lens
Skin/Faces
- Basecoat the skin with a 1:1 mix of Abyssal Blue and Black Leather
- Gradually add a neutral flesh tone such as Base Flesh in for successive highlights.
- Mix a little Pale Skin in for the final highlight.
- Wash the skin with Reikland Fleshshade
- Paint the eye sockets and mouth with Agrax Earthshade
- Paint the teeth with Mojave White
- Paint the eyes with Mephiston Red
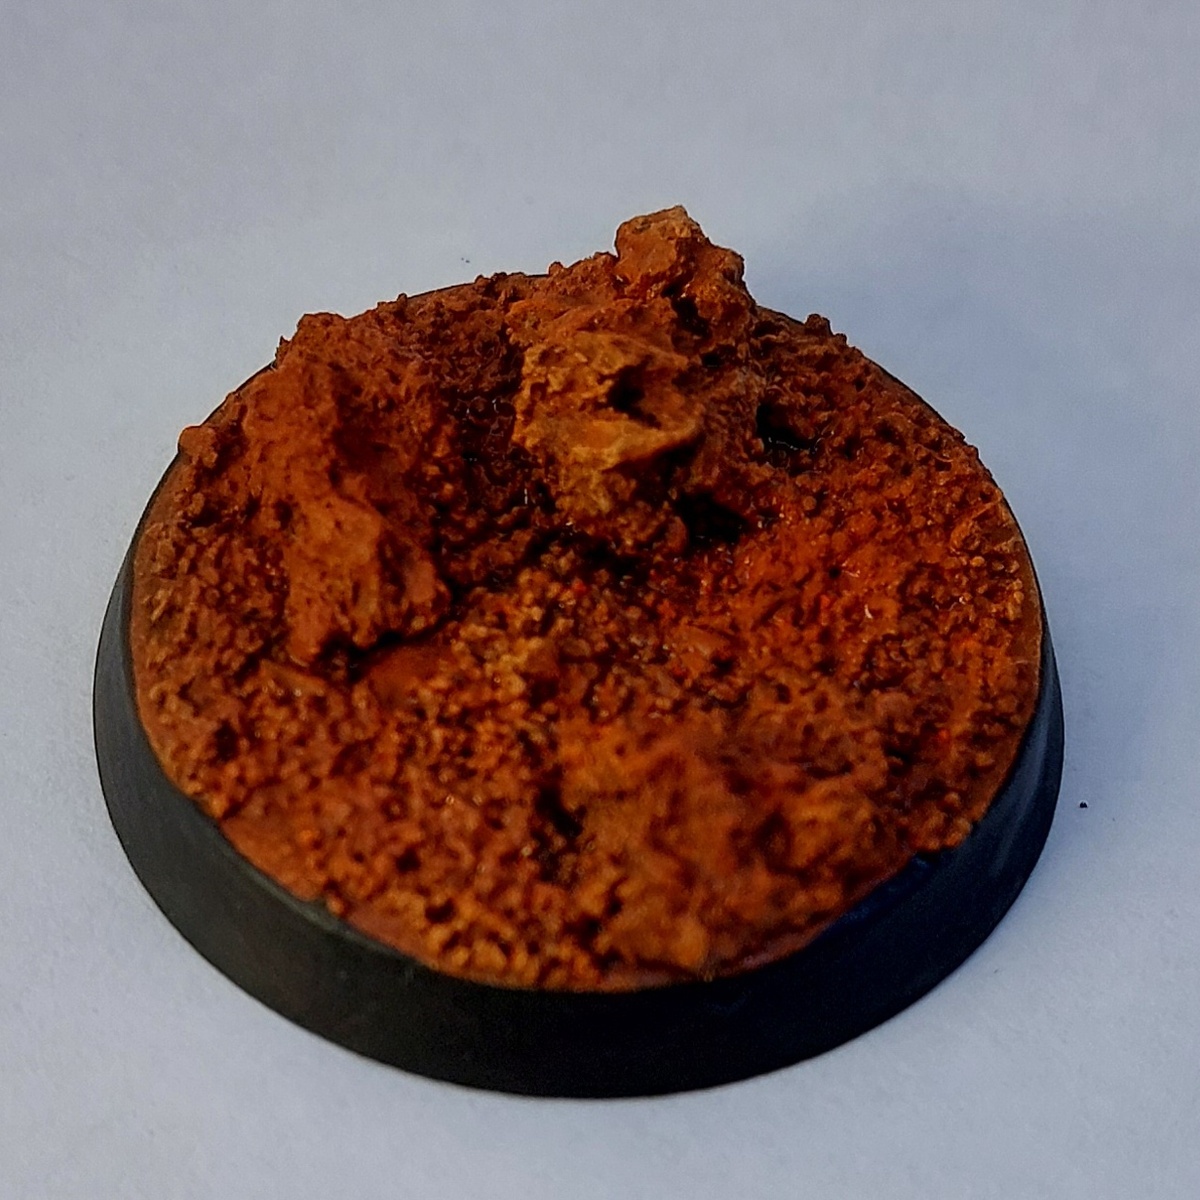
Bases
- Basecoat with Heavy Red
- Overbrush with Orange Red
- Drybush with a 1:1 mix of Orange Red and a pale yellow - I use Winsor & Newton Galeria Pale Lemon, just because I have it kicking about, but any pale yellow will do
- Drybrush very lightly with the same pale yellow.
- Wash with a 1:3:3 mixture of Ultra Matte Varnish : Airbrush Flow Improver : Skin Wash
- Add some deep shadows with Athonian Camoshade
- Stipple some orange pigment onto the base, and maybe a little onto the lower edges of the model. Don't go nuts! You can buy pigments from several places, but I use a £3 box of pastels I put into bags and bashed up!
- Paint the base rims with Black
AK Interactive
Varnish 1
- AK183 Ultra Matte Varnish
Citadel Painting System 25
Base 4
- Mephiston Red
- Retributor Armour
- Rhinox Hide
- Zandri Dust
Shade 5
- Agrax Earthshade
- Athonian Camoshade
- Nuln Oil
- Reikland Fleshshade
- Seraphim Sepia
Layer 13
- Balor Brown
- Dark Reaper
- Flash Gitz Yellow
- Liberator Gold
- Moot Green
- Slaanesh Grey
- Stormvermin Fur
- Thunderhawk Blue
- Ushabti Bone
- Warpfiend Grey
- Warpstone Glow
- Wazdakka Red
- Wild Rider Red
Technical 1
- Lahmian Medium
Air 1
- Troll Slayer Orange
Contrast 1
- Black Templar
Daler-Rowney
FW Acrylic Ink 2
- Burnt Umber
- Sepia
Monument Hobbies Pro Acryl
Base 1
- 001 Bold Titanium White
Scale75 Scalecolor 12
Scalecolor 10
- SC-00 Black
- SC-03 Graphite
- SC-08 Abyssal Blue
- SC-16 Eclipse Grey
- SC-17 Pale Skin
- SC-22 Arabic Shadow
- SC-32 Black Leather
- SC-43 Irati Green
- SC-57 Petroleum Gray
- SC-62 Mojave White
Fantasy & Games 2
- SFG-11 Bloodfest Crimson
- SFG-34 Arbuckles Brown
Scale75 Scalecolor Artist
Base 2
- SART-32 Spring Green
- SART-34 Sap Green
Vallejo Auxiliaries
Base 4
- 71.261 Airbrush Thinner
- 71.262 Airbrush Flow Improver
- 73.212 Decal Softener
- 73.213 Decal Fix
Vallejo Game Color 6
Base 2
- 72.033 Livery Green
- 72.095 Glacier Blue
Ink 1
- 72.093 Skin Wash
Extra opaque 3
- 72.141 Heavy Red
- 72.147 Heavy Black Green
- 72.155 Heavy Charcoal
Vallejo Metal Color
Base 3
- 77.703 Dark Aluminum
- 77.720 Gunmetal Grey
- 77.725 Gold
Vallejo Model Color
Base 4
- 70.910 Orange Red
- 70.954 Yellow Green (70.954)
- 70.985 Hull Red
- 70.986 Deck Tan
Vallejo Nocturna
Fairy Flesh 1
- 74.004 Base Flesh
WarColours
Ink 1
- Emerald