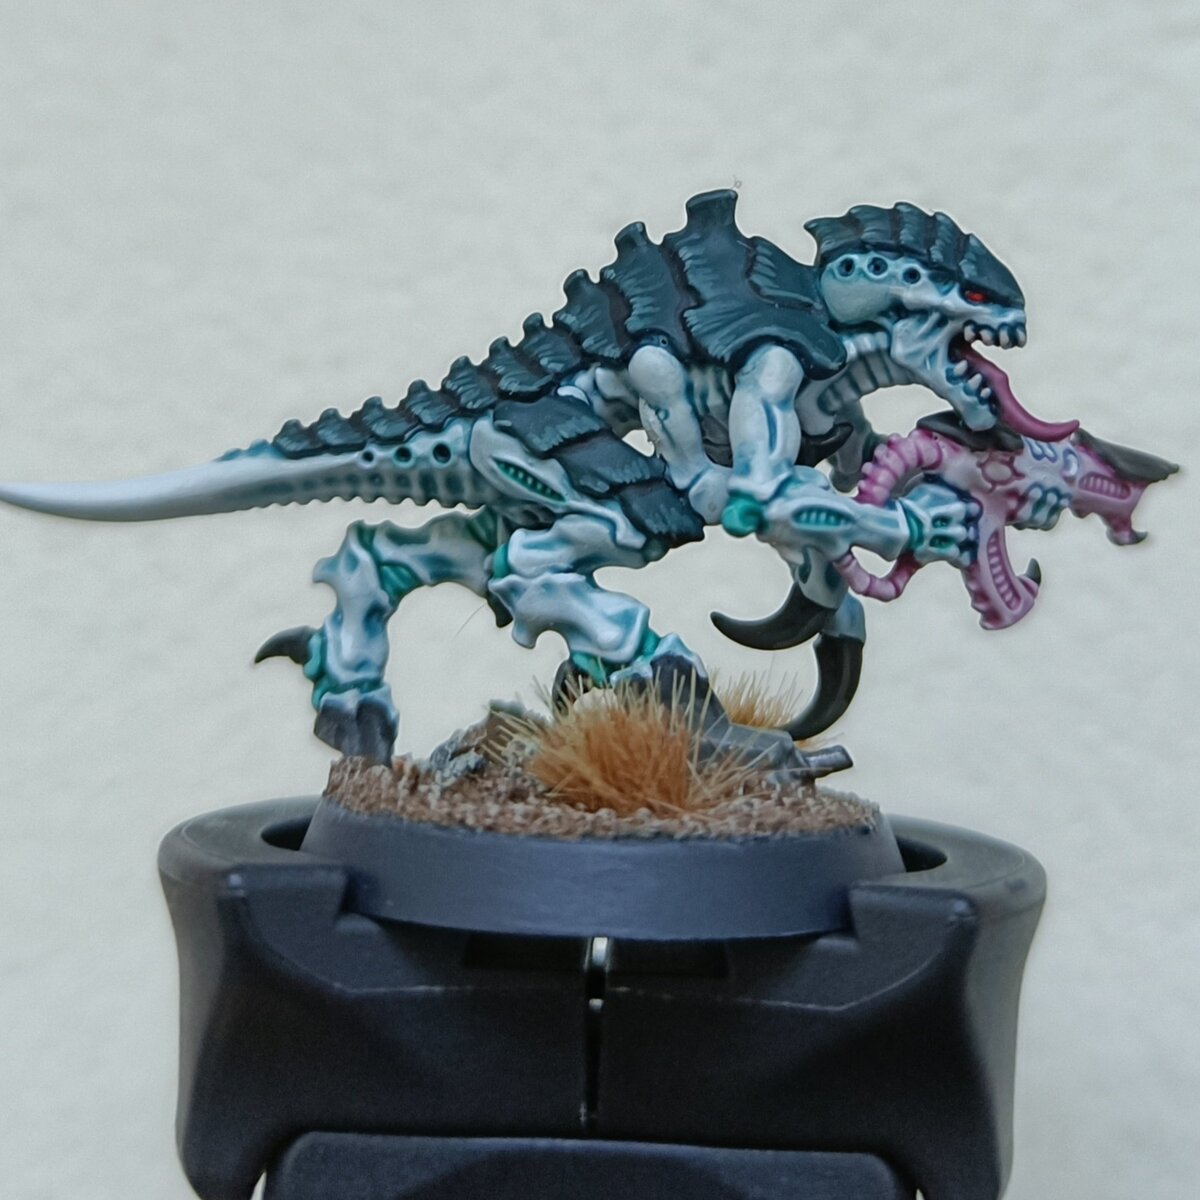
Adaptation of the 'Eavy Metal team's painting guide for Tiamet using Army Painter Speedpaints.
The original guide was posted in this article:
https://www.warhammer-community.com/2023/06/06/painting-leviathan-how-eavy-metal-tackled-the-new-tyranids-and-space-marines/
I've really enjoyed trying out Speedpaints with this scheme and highly recommend them. Dropper bottles, preloaded agitators and the price point make these an excellent contrast alternative.
A note on the two used, they are both from the 2.0 range so I will update the tutorial to reflect this better when support is added. Lizardfolk Cyan is a great match for Incubi Darkness, and Moonlake Coral is similar to Sigvald Burgundy but much pinker.
I will add step-by-step images when I start my next model!
Primer
- Prime model using Grey
Vallejo Mecha Grey is an off-white colour applied using an airbrush. However, feel free to use your choice of white primer (White Scar or Corax white etc). I found Grey Seer too dark.
Body
Do not paint the gun during these steps.
- Apply a mix of 1:6 Speedpaint: Battleship Grey and Speedpaint Medium over the body.
- Apply a mix of 1:6 Speedpaint: Lizardfolk Cyan and Speedpaint Medium over the body.
- Apply a 4:1 mix of Contrast Medium and Lupercal Green to the fleshy bits and joints of the body.
- Apply Ulthuan Grey on raised areas such as shoulders, and especially the tail to smooth the colour.
- Edge highlight with White Scar .
Gun
- Apply 10:1 Speedpaint Medium and Speedpaint: Moonlake Coral over the gun and pipes.
- Apply a mix of 6:1 Speedpaint Medium and Speedpaint: Moonlake Coral to the pipes.
- Using the 6:1 Speedpaint Medium and Speedpaint: Moonlake Coral mix, apply some to the mouth of the gun, and then while still wet using Speedpaint Medium to blend this towards the middle of the gun. Then do the same method starting from the bottom of the gun.
The goal with this last step is to leave the area around the eye on the gun mostly tinted pink via the very first step, and for other areas to appear more "raw" like in the eavy metal guide. If you haven't done blending like this before it is very easy, and I recommend watching the following timestamp for a video example:
https://youtu.be/JJGqInWb2yo?si=ictfyfovv7qtRb7Z&t=810
Tongue
- Apply Lizardfolk Cyan undiluted into the mouth. This helps to darken the inside of the mouth if it is not already sufficiently dark.
- Basecoat tongue using Glistening Gums .
- Apply 6:1 Speedpaint Medium and Speedpaint: Moonlake Coral all over the tongue.
- Highlight using Glistening Gums .
Hooves, Claws and Gun Chitin
- Basecoat using Abaddon Black
- Highlight with Skavenblight Dinge
- Fine edge highlight using Stormvermin Fur
Teeth
- Apply Lizardfolk Cyan over teeth and into the gums
- Paint the teeth Ivory Tusk
Eyes
- Apply Lizardfolk Cyan into the eye socket.
- Paint eyeball with Evil Sunz Scarlet .
Carapace
- Basecoat with a 1:1 mix of Incubi Darkness and Lupercal Green . I recommend premixing this in a bottle as this is the main colour.
- Recess shade using Abaddon Black
- Chunky edge highlight Lupercal Green
- Edge highlight Sons of Horus Green . Using a flicking motion to create a chipped chitin effect.
- Fine edge highlight with a 1:1 mix of Sons of Horus Green and Deepkin Flesh , again using the flicking motion.
Citadel Painting System 11
Base 3
- Abaddon Black
- Incubi Darkness
- Lupercal Green
Layer 7
- Deepkin Flesh
- Evil Sunz Scarlet
- Skavenblight Dinge
- Sons of Horus Green
- Stormvermin Fur
- Ulthuan Grey
- White Scar
Technical 1
- Contrast Medium
Vallejo Mecha Color
Base 1
- 69.037 Grey