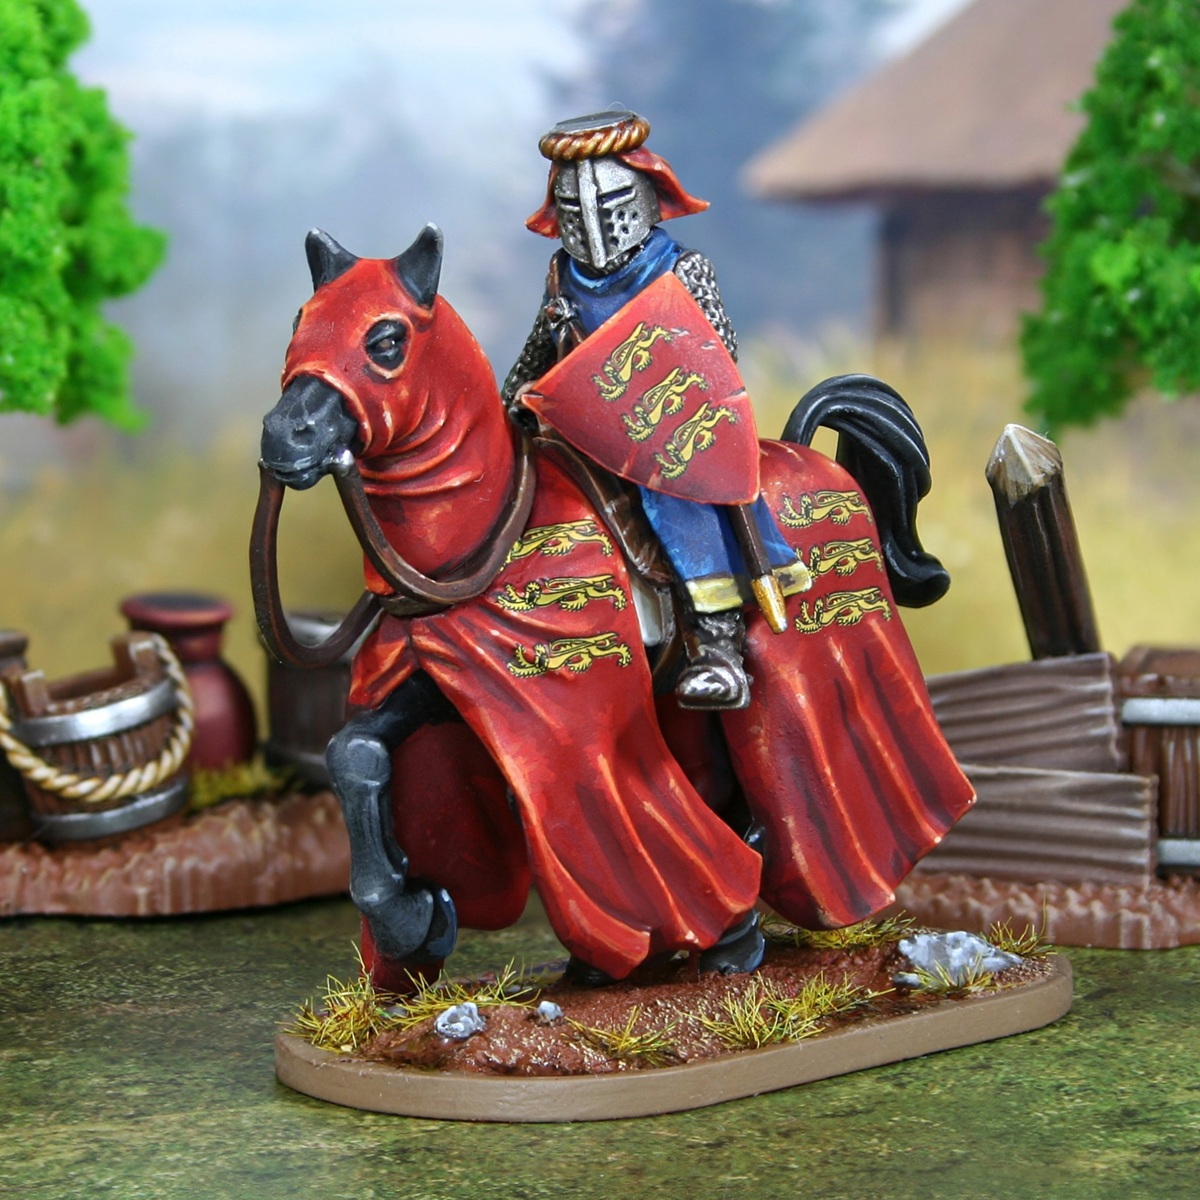
Barons' War: King John of England

I built this model using the Mounted Knights (1150-1320) plastic kit from Wargames Atlantic, exclusively. My aim with this guide is to leave you with a nice playable character from the "Dramatis Personae" section in the back of The Barons' War Second edition book and pay homage to the Footsore Miniatures model also available.
 You can find a more detailed guide, that covers painting technique and approaching characters in general in issue 137 of "Wargames Soldiers and Strategy". Be sure to check it out, if you want to see more from me.
To get started, I primed the model with Sanguine Red from Colour Forge. This step isn't 100% necessary, but it does make establishing a basecoat for our main colour easier.
Black Horse
- Basecoat with Black .
- Drybrush exposed areas with Skavenblight Dinge . I would recommend using a small brush and take the direction of the light into consideration. This stage is to act as a main highlight and add a little texture. Feel free to use a brush to pick out highlights on hard to reach parts.
- Selectively highlight edges and curved portions where the light mould hit using Stormvermin Fur .
- Mix a little Ivory (or another warm off-white) into your Stormvermin Fur and highlight more selectively.
Black Tail
- Basecoat with Black .
- Drybrush with Skavenblight Dinge .
- Selectively pick out upward facing curves with Stormvermin Fur .
- Mix a little Ivory into your Stormvermin Fur and add a few smaller highlights to accentuate the previous steps.
Red Cloth
- Basecoat with Mephiston Red .
- Shade folds and downward facing cloth with some pretty thin Khorne Red .
- Enhance the deepest and darkest parts of the cloth. For this, I mix my Khorne Red 1:1 with Abaddon Black and apply it more selectively.
- Apply some general highlighting to folds, corners and curved surfaces that are exposed to the light. For this I used Evil Sunz Scarlet . I applied these highlights in scratchy lines, pulling my brush towards what will be the brightest point.
- Highlight again, this time covering a smaller area with Troll Slayer Orange .
- Selectively highlight the brightest point using Fire Dragon Bright . You should be highlighting within the bound of the previous stage, accentuating the shape of the sculpt.
- Finish with very small/specular highlights of Fire Dragon Bright mixed 1:1 with some White .
I used this same recipe for the shield, just applied it in a slightly different way. Instead of relying upon scratchy highlights to add texture, I instead highlighted with clean and pretty uniform lines, making full use of the sharp edges on the shield. To stop things looking too uniform, I painted a few scratches with the final two colours, making it look like it has seen combat.
Decals
For those of you that are interested, I used the wonderful "Leopards - Yellow" sheet from Forgotten Chapters for the lions on the shield and caparison. It is a wonderful set and a worthy purchase for your Barons' War retinue.
https://www.forgottenchapters.eu/product/leopards-yellow/
Please do show some love and check out the rest of their sheets too!
Blue Cloth
- Basecoat with Kantor Blue .
- Shade recesses with a thin mix of 1:1 Kantor Blue and Abaddon Black .
- Apply chunky edge highlights of 1:1 Kantor Blue and Teclis Blue .
- Now highlight everything again, using fine lines of Teclis Blue .
- Selectively highlight with 1:1 Teclis Blue and Administratum Grey .
- Finish with specular highlights of Administratum Grey .
NMM Gold Trim
My method here is pretty loose, and I went back and forth a lot until I was fairly happy. As such, a step-by step will be hard. Instead I will simply list the paint I used in the rough order I did them.
- Basecoat of 1:1 Rhinox Hide & Balor Brown .
- Rhinox Hide
- Balor Brown
- Balor Brown and Flash Gitz Yellow 1:1
- Previous mix and Ice Yellow 1:1
- Small highlights of Ice Yellow .
- Specular highlights with a 1:1 mix of Ice Yellow and White .
I wasn't super impressed with the vibrancy of the gold when I was done, so I glazed with Fluorescent Yellow , then applied the last two highlights again.
Wood
- Basecoat with Thondia Brown .
- Shade with Rhinox Hide .
- Highlight and add woodgrain with a mix of 2:1 Thondia Brown and Steel Legion Drab .
- Take the above paint and mix it 1:1 with Administratum Grey . Now use this for fine highlights.
- Increase the amount of Administratum Grey again, then add selective highlights.
- Finish with a few specular highlights of pure Administratum Grey .
Dark Brown Leather
- Basecoat with Rhinox Hide .
- Add edge highlights to everything and volumetric highlights with Doombull Brown .
- Selectively highlight with XV-88 , using the big highlights from the previous stage as a guide.
- Finish with very small Screaming Skull highlights.
Saddle Pad
- Basecoat with Karak Stone .
- Shade with Steel Legion Drab .
- Deep shade with a 1:1 mix of Steel Legion Drab and Rhinox Hide .
- Glaze/chunky highlight with 1:1 Karak Stone and Screaming Skull . I would recommend doing several passes here, to really boost the brightness and always pull your brush towards the edge.
- Mix some of the previous paint 1:1 with White and add fine highlights.
- Mix your Karak Stone , Screaming Skull . and White 1:1 with more White . Now apply selective highlights with this bright paint.
- Finish with specular highlights of White .
Chainmail and Steel
- Basecoat with Leadbelcher .
- Wash with Nuln Oil .
- I also like to enhance the shading in recesses and where areas of steel need separating. For this I typically use glazes of Agrax Earthshade .
- Overbrush and highlight using Ironbreaker .
- Finish with selective highlights of Silver RLM01 Metallic .
Blade
- Basecoat with Silver .
- Glaze shading over half of the blade with Gryph-charger Grey . I would recommend keeping this thin and doing a couple of passes.
- Repeat on the half furthest from the pure silver, creating a rudimental gradient. This time I use Nuln Oil straight from the pot.
- Ensure tall edges are highlighted, where the previous two sets of glazes may have over spilled. For this I like to use Ironbreaker , simply because I find it catches edges easier than Vallejo Metal Color paints.
- Finish with selective highlights of Silver RLM01 Metallic on edges that still have the solid Silver basecoat. Focus more highlights towards the tip.
Gold Details
- Basecoat using Retributor Armour .
- Shade selectively with Reikland Fleshshade where there are details or recesses that need more definition.
- Add some Silver RLM01 Metallic to the Retributor Armour , and highlight selectively.
- Finish with a few dots of pure Silver RLM01 Metallic .

Rookie Brushes
RookieBrushes
Aspiring miniature painter and biscuit enthusiast. Here to share my hobby and help where I can.
Citadel Painting System 27
Base 10
- Abaddon Black
- Kantor Blue
- Khorne Red
- Leadbelcher
- Mephiston Red
- Retributor Armour
- Rhinox Hide
- Steel Legion Drab
- Thondia Brown
- XV-88
Shade 3
- Agrax Earthshade
- Nuln Oil
- Reikland Fleshshade
Layer 13
- Administratum Grey
- Balor Brown
- Doombull Brown
- Evil Sunz Scarlet
- Fire Dragon Bright
- Flash Gitz Yellow
- Ironbreaker
- Karak Stone
- Screaming Skull
- Skavenblight Dinge
- Stormvermin Fur
- Teclis Blue
- Troll Slayer Orange
Contrast 1
- Gryph-charger Grey
Colour Forge
Base 1
- Sanguine Red
Vallejo Game Color
Fluo 1
- 72.103 Fluorescent Yellow
Vallejo Metal Color
Base 1
- 77.724 Silver
Vallejo Model Air
Base 1
- 71.063 Silver RLM01 Metallic
Vallejo Model Color
Base 4
- 70.858 Ice Yellow
- 70.918 Ivory
- 70.950 Black
- 70.951 White