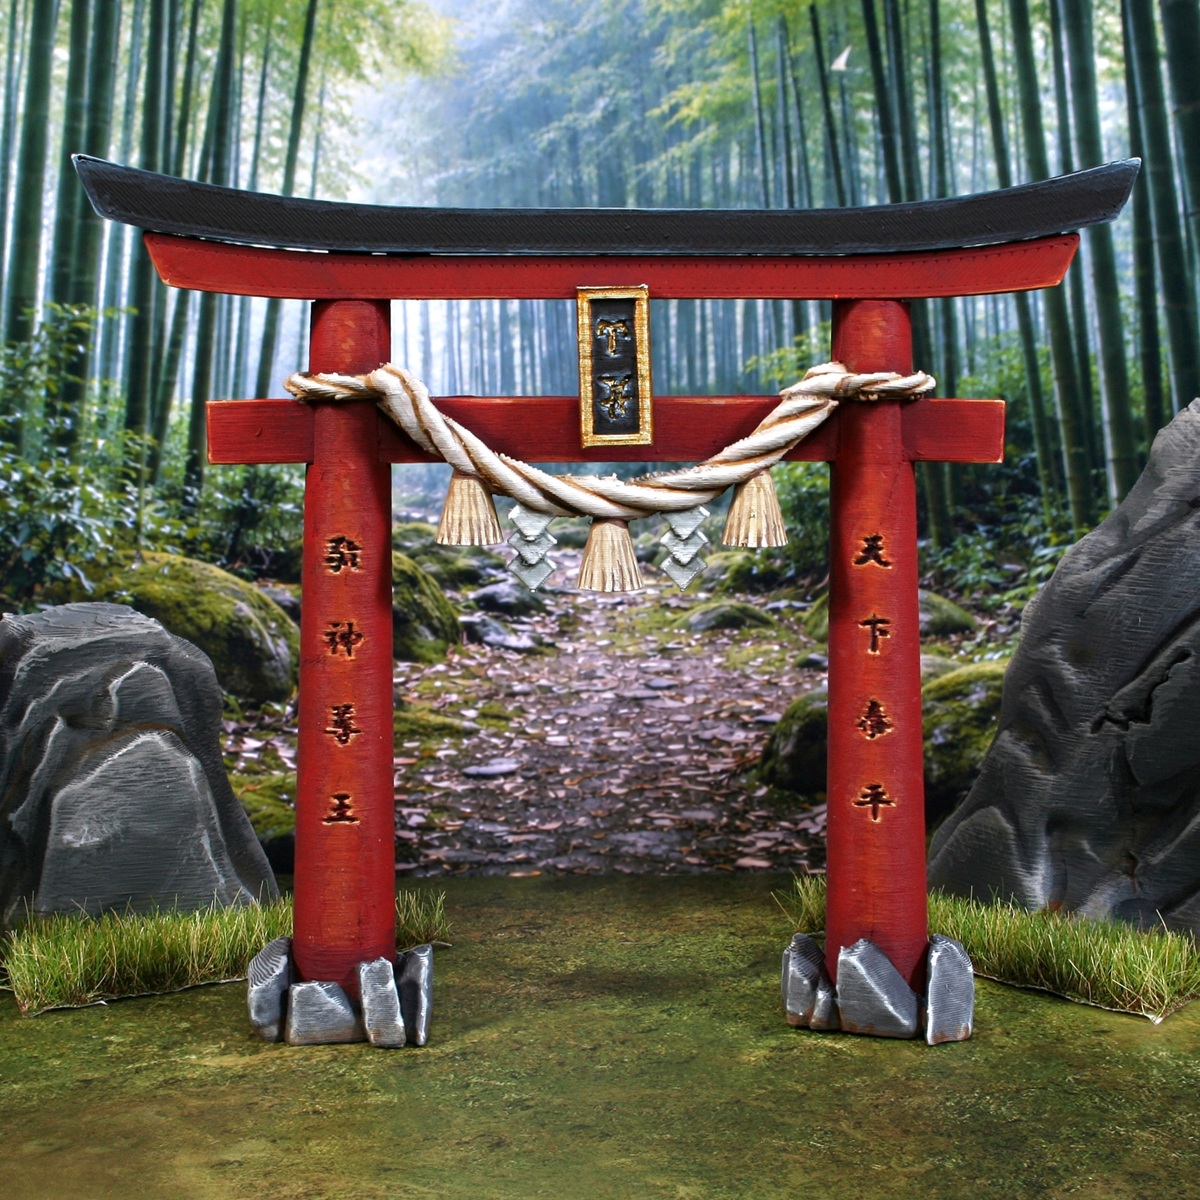

My painted Torii Gate, which was a 3D print from "3D Alien Worlds". This guide should cover the majority of elements from many other similar products too.
I started by priming my gate with Sanguine Red . This stage isn't necessary, but it sped things up.
Red Wood
- Basecoat with Khorne Red .
- Heavily drybrush with 1:1 Mephiston Red and Evil Sunz Scarlet . Use a big, fat brush and try to cover everything but recesses.
- Drybrush again, using Evil Sunz Scarlet . Build up colour in the centre of the posts and on edges.
- Flood any kanji with a thin mix of 1:1 Khorne Red and Abaddon Black .
- Highlight all edges with Troll Slayer Orange . I did this as a pretty fine highlight, but went heavier on corners. Feel free to enhance the colour with glazes, where you want to emphasise shape.
- Selectively Highlight with Tau Light Ochre .
- Finish with very small/specular highlights of 1:1 Tau Light Ochre and White .
Black Wood
- Basecoat with Black .
- Edge highlight everything with a thick line of Dark Reaper .
- Highlight everything again, this time with a thin line of Thunderhawk Blue .
- With Fenrisian Grey , selectively highlight.
- Finally, edge add small highlights to the centre of the previous highlights and corners with Blue Horror . Try to make them very small, dots if at all possible.
Rope
- Basecoat with 1:1 Wraithbone and Rakarth Flesh .
- Add general shading with thinned Karak Stone .
- Shade the deep parts of the recesses with 1:1 XV-88 and Rhinox Hide .
- Selectively shade with thin Rhinox Hide , hitting only the deepest downward facing recesses.
- Highlight with 1:1 Wraithbone and White .
- Selectively highlight with pure White .
Tassels
- Basecoat with Ushabti Bone .
- Add general shading with thinned 1:1 Ushabti Bone and Steel Legion Drab .
- Mix some Rhinox Hide into the above paint, then shade deepest parts of the recesses.
- Pick out the raised portions with thin lines of Screaming Skull .
- Mix your Screaming Skull with some White then selectively highlight the lowest part of the strands.
- Finish with specular White highlights.
Folded Paper
- Basecoat with 1:1 Celestra Grey and White .
- Glaze some shading in with Celestra Grey towards recesses.
- With a 1:1 mix of Celestra Grey and Skavenblight Dinge , shade more selectively.
- Carefully shade the very deepest recesses with pure Skavenblight Dinge . Be very selective here and keep your lines thin.
- Mix the basecoat 1:1 with White and pick out edges.
- Selectively highlight with pure White .
Stone
- Basecoat with Mechanicus Standard Grey .
- Heavily drybrush with Dawnstone .
- Drybrush slightly lighter with 1:1 Celestra Grey and Rakarth Flesh . Cover a smaller area, focusing on more exposed parts.
- Glaze Corvus Black into recesses for shading.
- Selectively highlight with Grey Seer .
- Now add a final selective drybrush with White . Go lighter and just try to hit the hardest edges. Feel free to manually add in highlights with a brush, where needed.
- Using thinned Steel Legion Drab glaze the lower potion of the rock, where it meets the earth. Where there a slight crevices' that dirt could build, feel free to go heavier and higher.
- Enhance the effect of dirt with glazes of Mournfang Brown , within the previous stages and covering a smaller area.
Gold Trim
- Basecoat with Retributor Armour .
- Mix a little Silver RLM01 Metallic into the Retributor Armour and highlight.
- Increase the amount of Silver RLM01 Metallic in the mix and selectively highlight corners.
- Finish with specular highlights of pure Silver RLM01 Metallic .

Rookie Brushes
RookieBrushes
Aspiring miniature painter and biscuit enthusiast. Here to share my hobby and help where I can.
Citadel Painting System 26
Base 14
- Abaddon Black
- Celestra Grey
- Corvus Black
- Grey Seer
- Khorne Red
- Mechanicus Standard Grey
- Mephiston Red
- Mournfang Brown
- Rakarth Flesh
- Retributor Armour
- Rhinox Hide
- Steel Legion Drab
- Wraithbone
- XV-88
Layer 12
- Blue Horror
- Dark Reaper
- Dawnstone
- Evil Sunz Scarlet
- Fenrisian Grey
- Karak Stone
- Screaming Skull
- Skavenblight Dinge
- Tau Light Ochre
- Thunderhawk Blue
- Troll Slayer Orange
- Ushabti Bone
Colour Forge
Base 1
- Sanguine Red
Vallejo Model Air
Base 1
- 71.063 Silver RLM01 Metallic
Vallejo Model Color
Base 2
- 70.950 Black
- 70.951 White