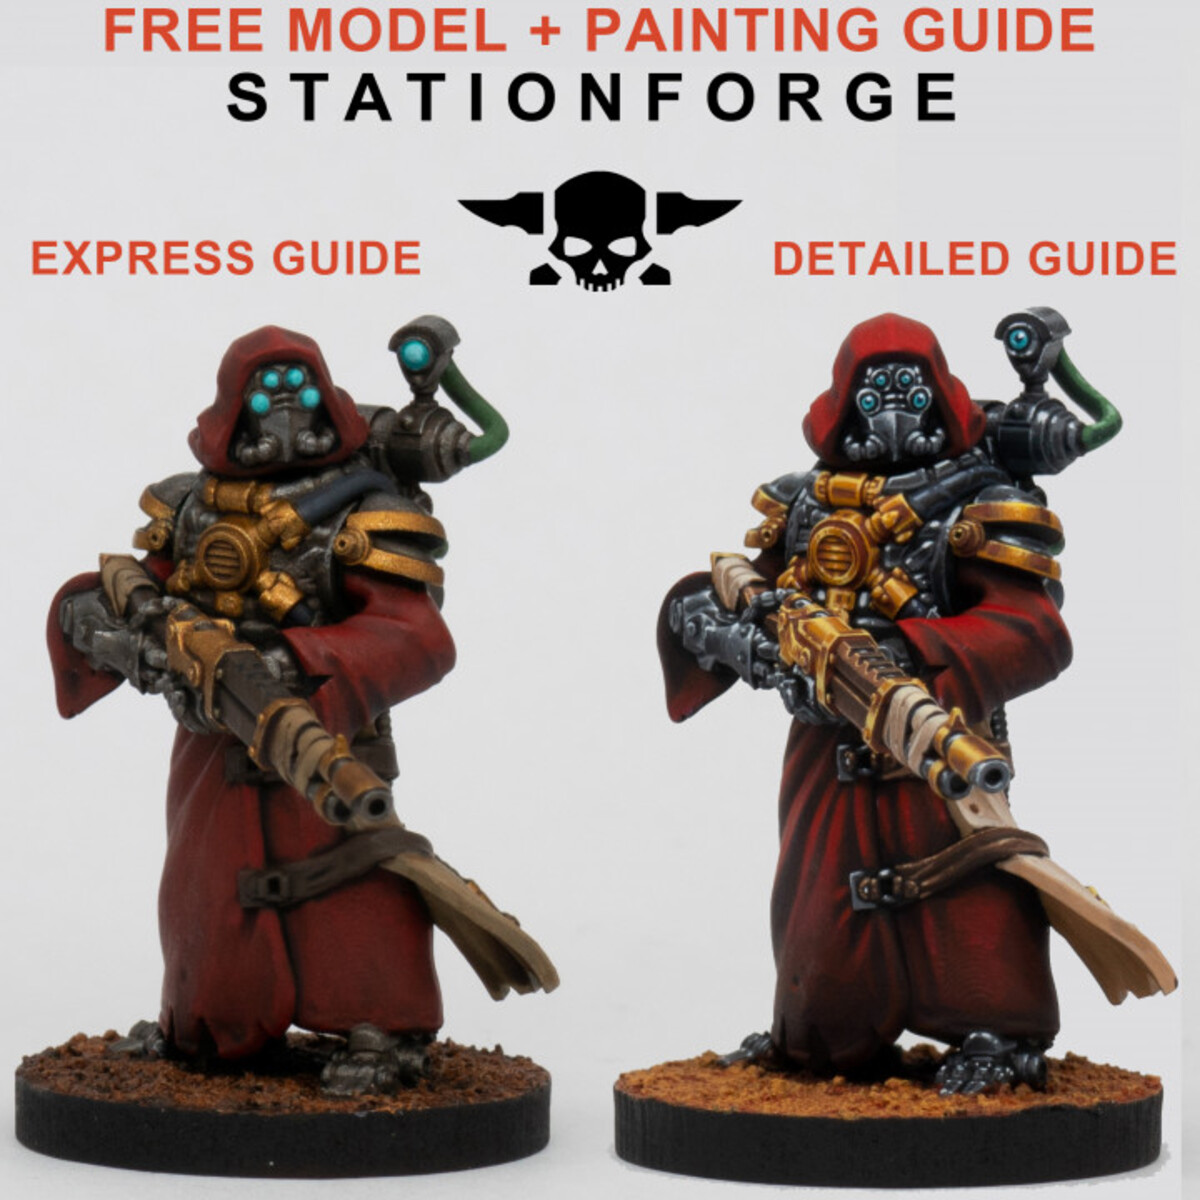
Scavenger Hunter
A detailed painting guide on how to paint the Scavenger Hunter from Station Forge.
https://www.myminifactory.com/object/3d-print-scavenger-hunter-painting-guide-model-304306
Robes
- Undercoat with a black primer
- Basecoat with Khorne Red
- Apply Gory Red over most of the fabric except for folds and recesses
- Sketch in highlights using White
- Paint over those highlights using Gory Red
- Apply a final highlight of Scarlet Blood focusing on areas such as the hood and tops of folds along the arms.
Metals - Steel
- Apply a base coat of Black Grey to the parts that will be steel
- Carefully outline each shape using Neutral Grey . Should be larger on parts most exposed to light.
- Highlight those areas using White along upper edges and corners.
Metals - Gold
- Basecoat with Cavalry Brown
- Paint in the reflections with White
- Paint over the White with Scrofulous Brown while leaving a subtle transition between the darker and lighter areas
- Highlight these sections using Light Yellow . Use this color selectively on the highest points to create contrast.
Wood & Leather
- Basecoat with Charred Brown
- Outline with Flat Brown . Carefully define edges and contours.
- Highlight upper edges with a 1:1 mix of Flat Brown and Sunny Skin Tone
- Final highlight with pure Sunny Skin Tone along upper edges
Cloth & Wraps
- Basecoat with Brown Sand
- Highlight with a 1:1 mix of Brown Sand and White . Focus on areas where light would naturally hit.
- Final highlight with a 1:2 mix of Brown Sand and White
Pipes
- Outline with Luftwaffe Uniform WWII
- Give the pipes a subtle glossy appearance using a 2:1 mix of Luftwaffe Uniform WWII and White . Paint short lines and dots along the edges of the pipes that are facing the light source.
Cables
- Basecoat with Dark Green
- Outline with Sick Green
- Add glossy lines using a 1:2 mix of White and Sick Green
Lenses
- Fill the center of each lens with Blue Green . Make sure to leave a black outline near the edges.
- Paint a dot of Night Blue in the center of each lens
- Add a small dot of White in the upper right corner of each lens. Slightly overlap the Night Blue dot.
- Add a smaller dot of 1:2 White and Blue Green in the opposite corner
Details
- Paint the gauge with Dark Sand and the dial with Khorne Red .
- Basecoat the little lights with White then apply Green Fluorescent and Orange Fluorescent to the left and right respectively.
Base
- Basecoat with Yellow Ochre
- Create a 1:3 mix of Cavalry Brown and Water. Don't let this wash touch the mini.
- Drybrush with Yellow Ochre
- Add a Black rim.

Travis Schall
SadNarwhal
Citadel Painting System
Base 1
- Khorne Red
Vallejo Game Color
Base 7
- 72.011 Gory Red
- 72.019 Night Blue
- 72.028 Dark Green
- 72.029 Sick Green
- 72.038 Scrofulous Brown
- 72.045 Charred Brown
- 72.106 Scarlet Blood
Vallejo Model Color 15
Base 13
- 70.808 Blue Green
- 70.816 Luftwaffe Uniform WWII
- 70.845 Sunny Skin Tone
- 70.847 Dark Sand
- 70.862 Black Grey
- 70.876 Brown Sand
- 70.913 Yellow Ochre
- 70.949 Light Yellow
- 70.950 Black
- 70.951 White
- 70.982 Cavalry Brown
- 70.984 Flat Brown
- 70.992 Neutral Grey
Fluorescent 2
- 70.733 Orange Fluorescent
- 70.737 Green Fluorescent
