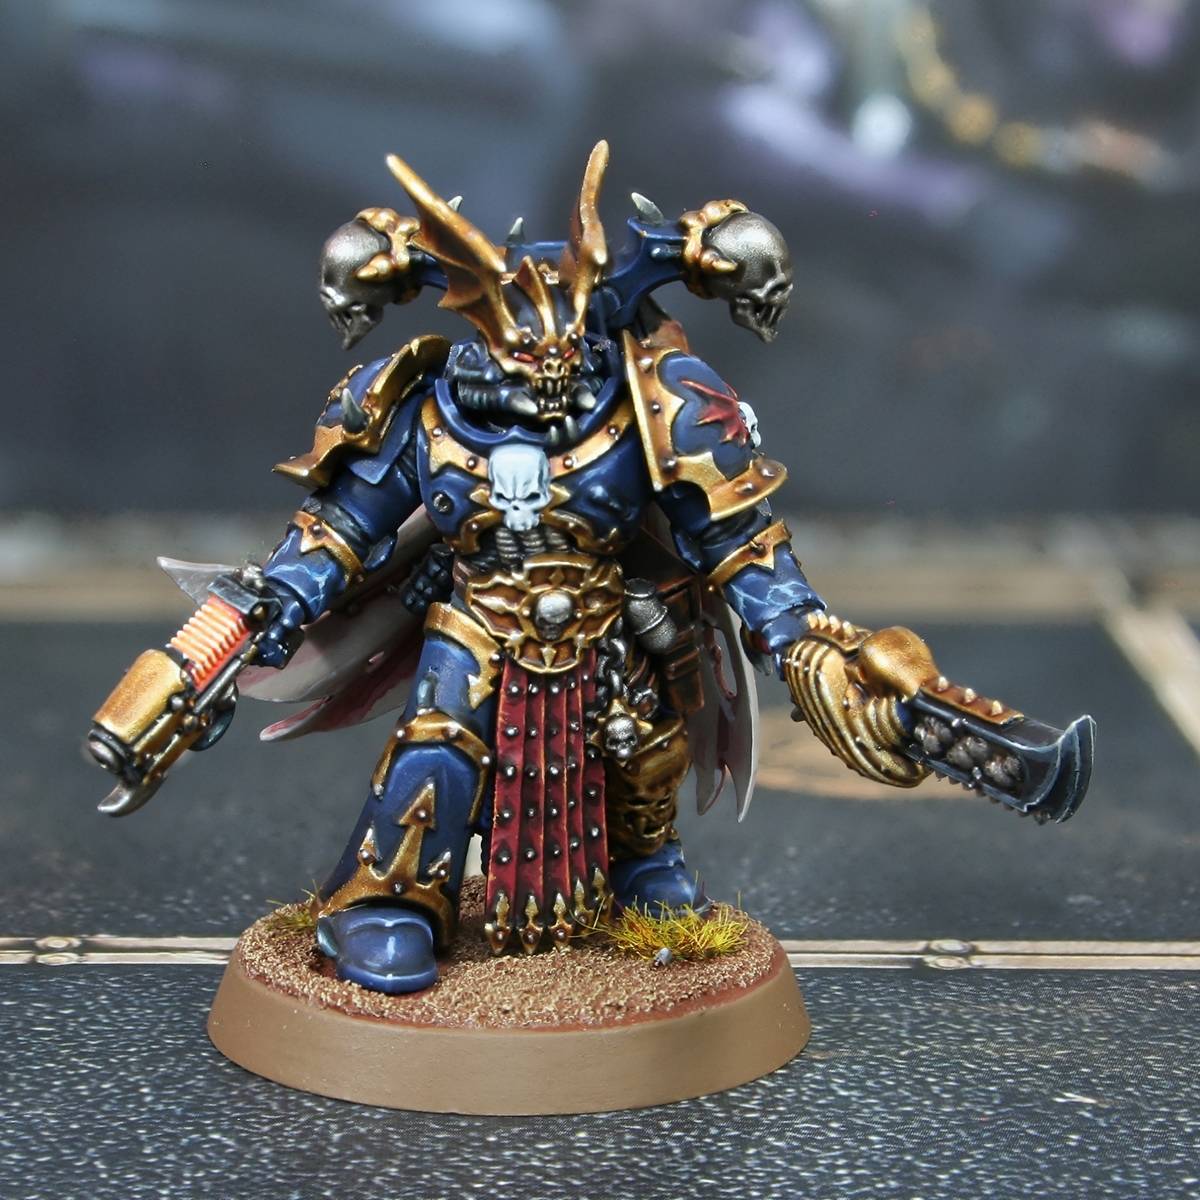
Night Lords/Nemesis Claw Kill Team

I this guide I will show you how I painted the Night Lords from the Kill Team: Nightmare bow set. Althought I have painted the specific "Nemesis Claw" team hear, you could definately apply these stages to the normal Chaos Space Marine Models too.
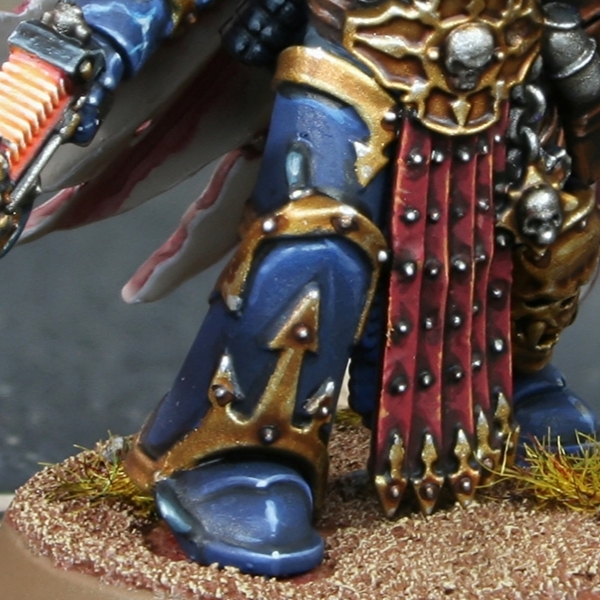 Blue Armour
- Basecoat with Night Lords Blue .
- Shade the recesses with Night Lords Blue and Black . Keep this paint thin and use a fine brush.
- Glaze and add chucky highlights with Kantor Blue . The basecoat is quite dark, so be quite generous with this stage in exposed areas that you want to end up a lot brighter.
- Apply finer highlights with Altdorf Guard Blue .
- Highlight selectively with 1:1 Altdorf Guard Blue and Fenrisian Grey . Like previously, apply more highlits in more exposed areas that would catch more light.
- With pure Fenrisian Grey highlight again, but coverring a small areas. I tend to make these very selective and almost specular highlights in more shaded areas.
- Finish with specular highlights of White on edges that end it a point or would catch a lot of light.
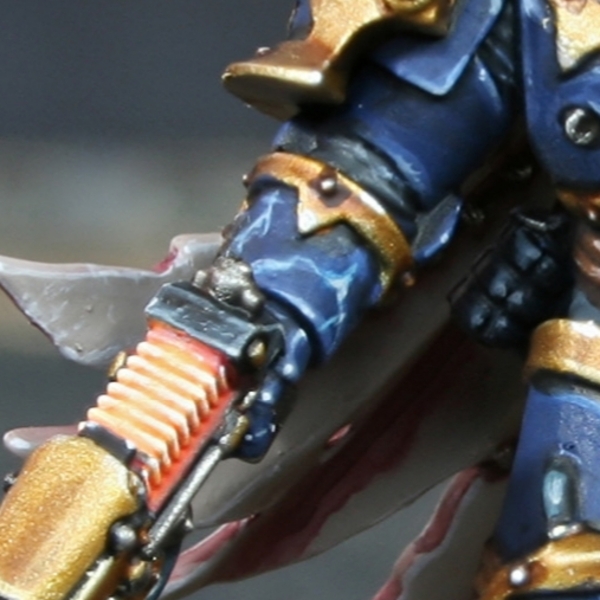 Lightning Design
- Sketch out the main pattern of the lightening bolts with the Altdorf Guard Blue from earlier. These lines can be pretty chunky.
- Within the last stage, pick out the lightning with fine lines of Lothern Blue . It is a good idea to put in estra thin branches at this point too.
- Usuing Ulthuan Grey , selectively enhance brightness within the previous stage. I like to sthick to areas where the bolt branches.
- Finish off the lightning with dots of White within the previous stage. Again, I would recommend sticking to points where it branches.
Rubber Undersuit
- Basecoat with a dark grey. I used a 1:1 mic of Corvus Black and Dawnstone , but may have been over complicating things. You could easily just use Eshin Grey or even Mechanicus Standard Grey .
- Wash with Nuln Oil .
- Pick out a majority of the edges with Dawnstone .
- More selectively highlight with Administratum Grey .
- If you wanted too, you could mix some White into your Administratum Grey and highlight an even smaller area. I find most areas are tucked away enough, that this is unecessary, though.
 Steel
Steel
- Basecoat with Leadbelcher .
- Wash with Nuln Oil .
- Highlight with Ironbreaker .
- Pick out selective highlights with Silver RLM01 Metallic .
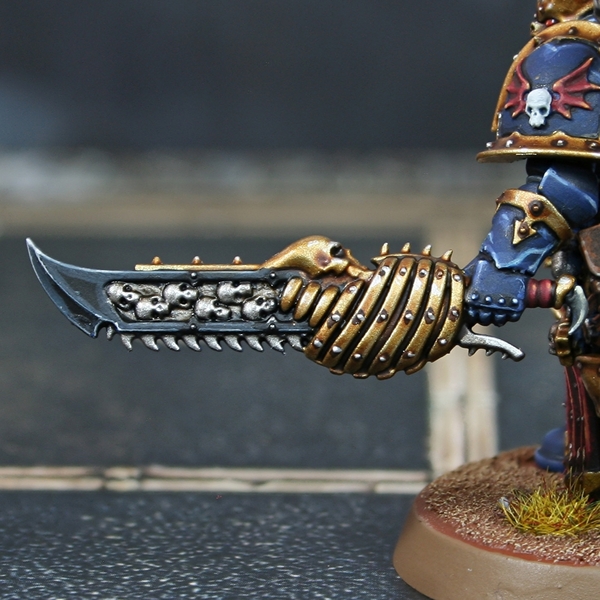
 Gold Trim
- Basecoat with 3:1 Retributor Armour and Silver RLM01 Metallic .
- Shade with Agrax Earthshade . I applied this as an all over wash, but pulled the pigment towards details and recessed.
- With the gold looking sufficiantly tarnished, I like to add some warmth to large areas that look a little plain. For this, I put a drop of Reikland Fleshshade on my palette and apply glazes, as well as flood a few details to break up panels.
- In deep recesses and around rivets, paint small amounts of thin Rhinox Hide and Abaddon Black .
- Increas the amount of silver in your base mix, so it is roughly 1:1 Retributor Armour and Silver RLM01 Metallic . Use this colour to add edge highlights and general highlights of particuarly exposed areas.
- Finish with selective highlights and specular highlightsm using pure Silver RLM01 Metallic .
 Red Eye Lenses
- After painting the gold trim, the eye socket should already be a pretty dark brown, but basecoat the lense itself with 1:1 Khorne Red and Abaddon Black .
- Pick out the most central part of the lens with Khorne Red , pulling your brush toiward the nose.
- Do the same again, coverring most of the last stage with Mephiston Red . This should be roughly two thirds of the area, leaving the :khorne red furthest from the nose uncovered.
- Repeat the above, coverring around half with Wild Rider Red .
- Pick out the quarter closest to the nose with Fire Dragon Bright .
- Mix some White into you Fire Dragon Bright and pick out a dot highlight close to the nose.
- Finish with a dot of pure White in the corner furthest from the nose.
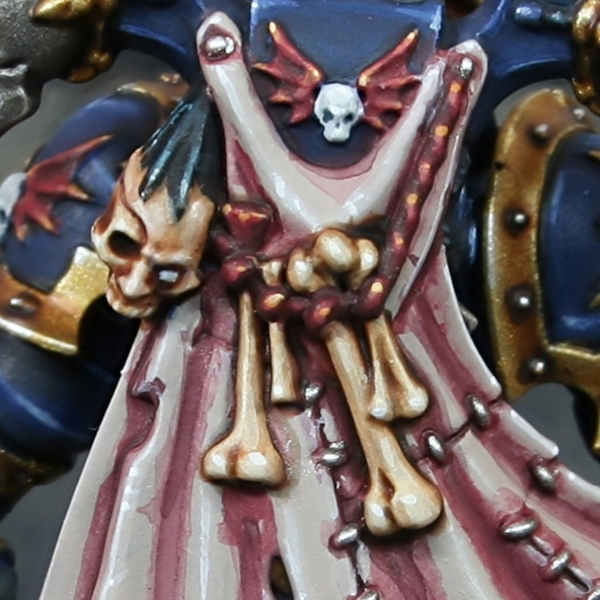
Dark Brown Leather
- Basecoat the leather area with Rhinox Hide .
- Glaze most of the leather with thinned Mournfang Brown . Use quite a small brush and drag towards edges in rough lines. This should create some extra texture.
- Add a chunky edge highlight of Skrag Brown to all edges.
- Highlight everything again, this time with a fine line of Skrag Brown and Ushabti Bone mixed 1:1. This is a good mix to throw in occasional fine lines as scratches too.
- With pure Ushabti Bone , selectively highlight corners and exposed edges of the leather. Put a dot of this colour where the additional scratched above meet edges too.
- Add a little pure white (like White ) to your Ushabti Bone and add dot highlights to corners.
 Red Cloth
- Basecoat with Khorne Red .
- Shade with 1:1 Khorne Red and Abaddon Black .
- Deep shade with small amounts of Abaddon Black where needed.
- Apply chunky highlights of Wazdakka Red .
- Fine highlights of Squig Orange .
- Selectively highlight with Tau Light Ochre .
- If you need a little extra punch, consider small/specular highlights of Ice Yellow or mix an off white into your Tau Light Ochre .
I used this same recipe for the wings of the Night Lords symbol, red rope, weapon handles and several other details too.
 White Skull (Nigh Lords Symbol)
- Basecoat with 1:1 Celestra Grey and White .
- Add general shading with some thin Fenrisian Grey .
- Darken the shading in deep recesses with small amounts of Dark Reaper .
- Increase the amount of White in the base mix, and highlight raised /exposed details.
- Finish with small highlights of pure White .
 Skin Capes and Tabbards
- Basecoat with Rakarth Flesh .
- Thin down Gorthor Brown and Khorne Red 1:1 and use it to shade folds.
- Enhance the deepest parts of the folds and around stitching with a mix of Khorne Red and Abaddon Black . I had a little flow improver in my water to control it better.
- Apply scrathy, chunky highlights around edges and at the peak of folds, using 1:1 Grey Seer and Rakarth Flesh .
- Add fine highlights and additional thin scratches with 1:1 Grey Seer and White .
- Finish with specular highlights of White on corners and where scratched meet the edge.
 Black Weapon Casing
- Basecoat with Black .
- Apply chunky highlights of Dark Reaper .
- Add finer highlights of 1:1 Dark Reaper and Administratum Grey .
- Selectively highlight corners and curves with Administratum Grey .
- Add a few specular highlights of White where needed.
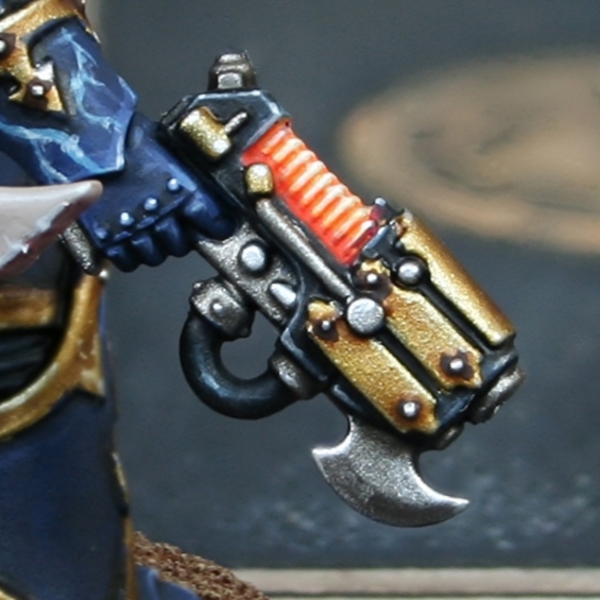 Orange Plasma
- Basecoat with Ice Yellow . If you are a Citadel purest, Dorn Yellow is probably the closest substitute.
- Wash with thinned Fire Dragon Bright .
- Pick out the deepest reces topwards the bottom of the coil with thinned Wild Rider Red .
- Edhe highlight the highest bits of the coil with Ice Yellow again.
- Selectively highlight the corner/cuirve of the coil with White .
It is rare that I am happy with how these plasma coils look after the first run through this method. Hopwever, most oranges don't cover particularly well, so you may want to go back and forth with glazes and re-highlighting until you are happy. Glazing with Orange Fluorescent is also a quick way to unify and add vibrancy.
 Black Rubber Tubing
- Basecoat with Abaddon Black .
- Paint chunky highlights of Incubi Darkness onto raised details.
- Mix the Incubi Darkness 1:1 with Deepkin Flesh and add fine highlights onto edges.
- Add selective hihglights of Deepkin Flesh on courners and points that would catch the light.
- Mix a little Ivory or Pallid Wych Flesh into your Deepkin Flesh and add specular highlights where needed.
 Claws
Claws
- Basecoat with Skavenblight Dinge .
- Shade around the base with a mix of Skavenblight Dinge and Abaddon Black .
- Mix the Skavenblight Dinge with Ushabti Bone and glaze towards the tip. Depending upon the side of the bone, you might want to add the Ushabti Bone gradually, and do this in a few passes.
- Add a fine highlight of pure :ushabti, pulling the brush towards the tip.
- Mix a little White into the Ushabti Bone and selectively highlight the tip.
- Finish off with a dot of pure White on the point.
 Bone
Bone
- Basecoat with Ushabti Bone .
- Shade with Guilliman Flesh , mostly washing the whole surface, but pulling pigment towards the darker areas.
- At this point, I like to reestablish the :ushabti bone, glazing it over raised areas.
- Mix some White into you Ushabti Bone and apply fine highlights.
- Finish with a few very small highlights of White .

Rookie Brushes
RookieBrushes
Aspiring miniature painter and biscuit enthusiast. Here to share my hobby and help where I can.
Citadel Painting System 40
Base 15
- Abaddon Black
- Celestra Grey
- Corvus Black
- Grey Seer
- Incubi Darkness
- Kantor Blue
- Khorne Red
- Leadbelcher
- Mechanicus Standard Grey
- Mephiston Red
- Mournfang Brown
- Night Lords Blue
- Rakarth Flesh
- Retributor Armour
- Rhinox Hide
Shade 3
- Agrax Earthshade
- Nuln Oil
- Reikland Fleshshade
Layer 21
- Administratum Grey
- Altdorf Guard Blue
- Dark Reaper
- Dawnstone
- Deepkin Flesh
- Dorn Yellow
- Eshin Grey
- Fenrisian Grey
- Fire Dragon Bright
- Gorthor Brown
- Ironbreaker
- Lothern Blue
- Pallid Wych Flesh
- Skavenblight Dinge
- Skrag Brown
- Squig Orange
- Tau Light Ochre
- Ulthuan Grey
- Ushabti Bone
- Wazdakka Red
- Wild Rider Red
Contrast 1
- Guilliman Flesh
Vallejo Model Air
Base 1
- 71.063 Silver RLM01 Metallic
Vallejo Model Color 5
Base 4
- 70.858 Ice Yellow
- 70.918 Ivory
- 70.950 Black
- 70.951 White
Fluorescent 1
- 70.733 Orange Fluorescent