Battle Sisters cloth and robes
Based on the brilliant idea from https://garethnicholasblog.wordpress.com/2020/01/18/battle-sisters/
- Prime with Chaos Black
- Layer robe outside with 1:1 of Xereus Purple and Magenta
- Layer the inside of the robes with Naggaroth Night
- Shade recesses outside with Nuln Oil and/or darken down with Naggaroth Night
- Broader highlight with 1:2 mix of Xereus Purple and Magenta
- Fine highlight with 1:2 mix of Xereus Purple and Magenta and an increasing part of White
Novitiates cloth and robes
- Prime with Chaos Black
- Layer outside with Genestealer Purple and the inside of the robes with Xereus Purple
- Wash with Nuln Oil
- Brighten up layer with Genestealer Purple , leaving out recesses
- Mix 50% Genestealer Purple and Dechala Lilac for another layer
- Edge highlight with Dechala Lilac
Novitiates hoods
- Base with Celestra Grey
- Shade with Nuln Oil
- Layer with Ulthuan Grey
- Broad highlight White
Arco-Flagellant Skin
- Prime with Wraithbone and layer with Pallid Wych Flesh
- Shade skin with Reikland Fleshshade
- Brighten up between recesses with Pallid Wych Flesh
- Highlight with White
- Highlight scars with Screamer Pink
Arco-Flagellant/Penitent Robes
- Base with Mechanicus Standard Grey
- Shade with Agrax Earthshade
- Brighten up with Mechanicus Standard Grey
- Edge highlight with Dawnstone
Power Armor
- Base with Corvus Black
- Wash with Nuln Oil
- Edge highlight with Mechanicus Standard Grey
- Point highlight with Administratum Grey
Weapons and metal
- Base with Leadbelcher
- Wash with Nuln Oil
- Layer again with Leadbelcher , leaving out recesses
- Highlight with Stormhost Silver
White insignia and fleur de lis
- Base with Ulthuan Grey
- Wash with Nuln Oil
- Layer again with Ulthuan Grey , leaving out recesses
- Highlight with White Scar or White
Golden insignia and dapper
- Base with Retributor Armour
- Wash with Nuln Oil
- Highlight with Liberator Gold
Hair
- Base with Pallid Wych Flesh
- Wash with Agrax Earthshade
- Highlight with Pallid Wych Flesh
- Further highlight with White Scar or White
Dark Leather
- Base with Dryad Bark
- Wash with Nuln Oil
- Edge highlight with Stormvermin Fur
- Point highlight with Administratum Grey
Light Leather
- Base with Mournfang Brown
- Wash with Agrax Earthshade
- Highlight with Skrag Brown
Light Skin
- Base with Cadian Fleshtone
- Shade with Reikland Fleshshade
- Highlight with Kislev Flesh
- Point highlight with Screaming Skull
Dark Skin
- Base with Catachan Fleshtone
- Shade with Agrax Earthshade
- Highlight with Bloodreaver Flesh
- Highlight with Knight-questor Flesh
Skulls
- Base with Zandri Dust
- Wash with Agrax Earthshade
- Highlight with Ushabti Bone
- Further highlight facial features with Screaming Skull
Parchment (acc. to Citadel app, maybe bs)
- Base with Rakarth Flesh
- Shade with Seraphim Sepia
- Layer with Pallid Wych Flesh
- Layer with thinned White
Sigils
- Base with Mephiston Red
- Shade with Nuln Oil
- Brighten up with Mephiston Red
- Edge hightlight with Evil Sunz Scarlet
Statues
- Base with Pallid Wych Flesh
- Shade with Agrax Earthshade , Seraphim Sepia or Nuln Oil
- Layer with Pallid Wych Flesh
- Highlight with White
Blue Flames
- Layer with White
- Fade a shine around the flame with White
- Tint more central flames with Aethermatic Blue and peripheral with Talassar Blue
- Highlight inner ridges with a light blue Teclis Blue and the most central ones with White
- Tanks
 Prime with Chaos Black
- We assume the base is primed with Chaos Black
- Continue with the steps below in the following order
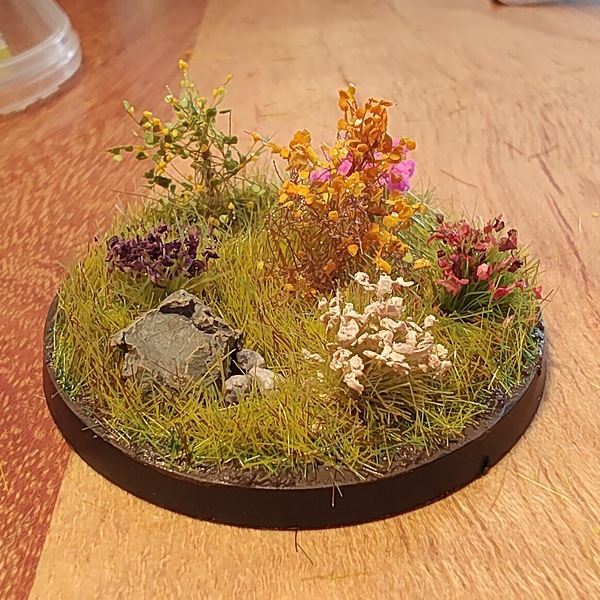
 II. Bases (Rocks)
- Here we use Battlefield rocks from Army Painter and base them with Dawnstone before gluing them to the mini base.
- Glue the rock with super glue and shade the rocks with Agrax Earthshade
- Dry brush Karak Stone
 III. Bases (Technical Paint)
- Apply Stirland Mud texture paint. For the purpose of saving time and money, you only need to apply this towards the edges of the base, as this will be where the soil shines through.
 IV. Bases (Static Grass)
Here we use a static grass approach to contrast the deep purples with summer grass. Two mixes of different lengths of static grass are produced (all from greenstuffworld.com).
I. 2-3mm mix of Dry Yellow Pasture/Spring Grass/Deep Green Meadow of 1:3:3
II. 4-6mm mix of Dry Yellow Pasture/Spring Grass 1:1
- Thin PVA glue with water and apply it over all the grassy areas.
- Then use the applicator to first apply a layer of 2-3mm mix, shake excess off and re-apply.
- Then apply the 4-6mm mix (without adding any new glue), shake excess off and re-apply.
- These should now give a diverse and natural look. Clean up any stray grass from the rim by carefully brushing in direction of its growth.
 V. Bases (Decoration)
- Super glue any shrubs, flowers, wild mushrooms to the base as easter eggs if you desire.
Citadel Painting System 43
Base 13
- Catachan Fleshtone
- Celestra Grey
- Corvus Black
- Dryad Bark
- Leadbelcher
- Mechanicus Standard Grey
- Mephiston Red
- Mournfang Brown
- Naggaroth Night
- Rakarth Flesh
- Retributor Armour
- Screamer Pink
- Zandri Dust
Shade 4
- Agrax Earthshade
- Nuln Oil
- Reikland Fleshshade
- Seraphim Sepia
Layer 21
- Administratum Grey
- Bloodreaver Flesh
- Cadian Fleshtone
- Dawnstone
- Dechala Lilac
- Evil Sunz Scarlet
- Genestealer Purple
- Karak Stone
- Kislev Flesh
- Knight-questor Flesh
- Liberator Gold
- Pallid Wych Flesh
- Screaming Skull
- Skrag Brown
- Stormhost Silver
- Stormvermin Fur
- Teclis Blue
- Ulthuan Grey
- Ushabti Bone
- White Scar
- Xereus Purple
Texture 1
- Stirland Mud
Spray 2
- Chaos Black
- Wraithbone
Contrast 2
- Aethermatic Blue
- Talassar Blue
Vallejo Model Color
Base 2
- 70.945 Magenta
- 70.951 White



.png)